EOS R5, C-Log 3, Ninja V and Resolve
Update: Check the latest tests with the EOS R5 and recording formats. Check the Ultimate Atomos Ninja Setup Guide for Canon and Sony Cameras: https://youtu.be/iv3rreK0D9Q
The Canon EOS R5 and the release of 1.3.1 firmware provide a unique opportunity to try C-Log 3 on a mirrorless camera instead of the cinema line of cameras, and while recoding in RAW, Resolve provides the opportunity to try C-Log 2. Considering the caveat of overheating and the time limit, a workaround that many have proposed is the use of the Atomos Ninja V external recorder, but depending on the color space, gama and color matrix selected in the camera, the results may vary, adding to this, the limited vs full range levels in video, so I decided to do a practical exercise to answer some of the questions I didn’t find any answer online:
- Is there a difference between internal and external footage?
- LUTs vs. Color Space Transform
- Which color space and gama should I use with the Atomos Ninja V?
Internal vs. External on Resolve
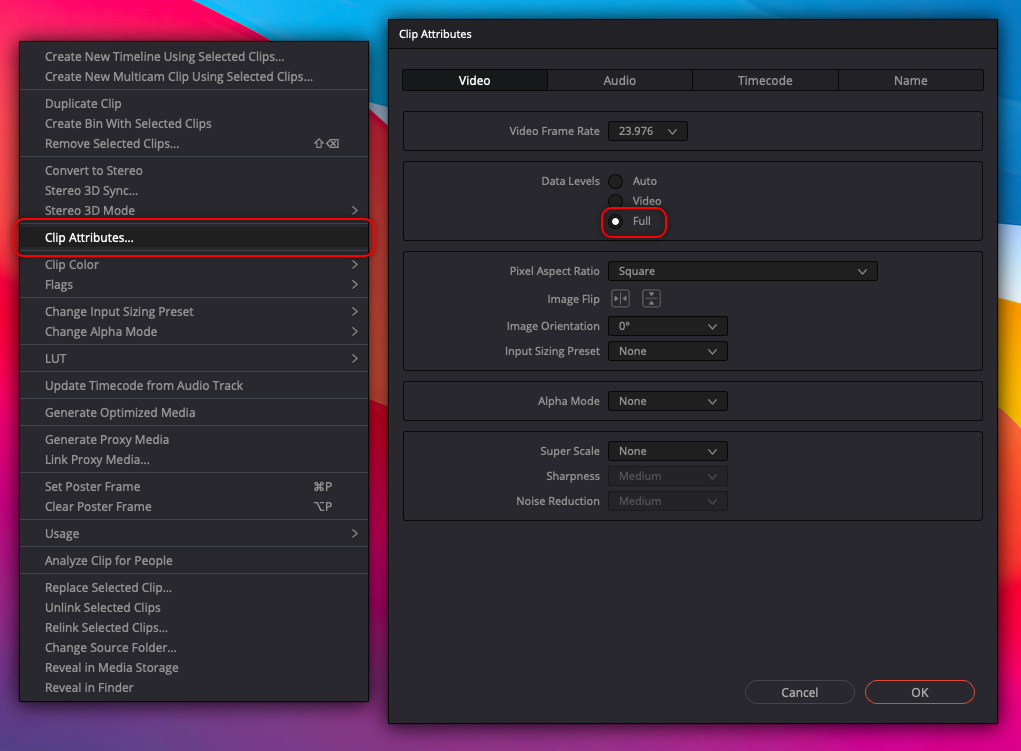
The Atomos Ninja V captures the signal as it is receieved (unless you choose to bake in a LUT), and most cameras produce full range video. The Atomos Ninja V provides a toggle to “legalize” the full range signal, this is mainly because Adobe Premiere and Final Cut Pro doesn’t have the option to “Interpret Footage” as “full range”, but Blackmagic Design DaVinci Resolve 17 does, that is why I only use this software. The only thing to do, after recording and importing your video to Resolve, is set its data levels values to “full”:
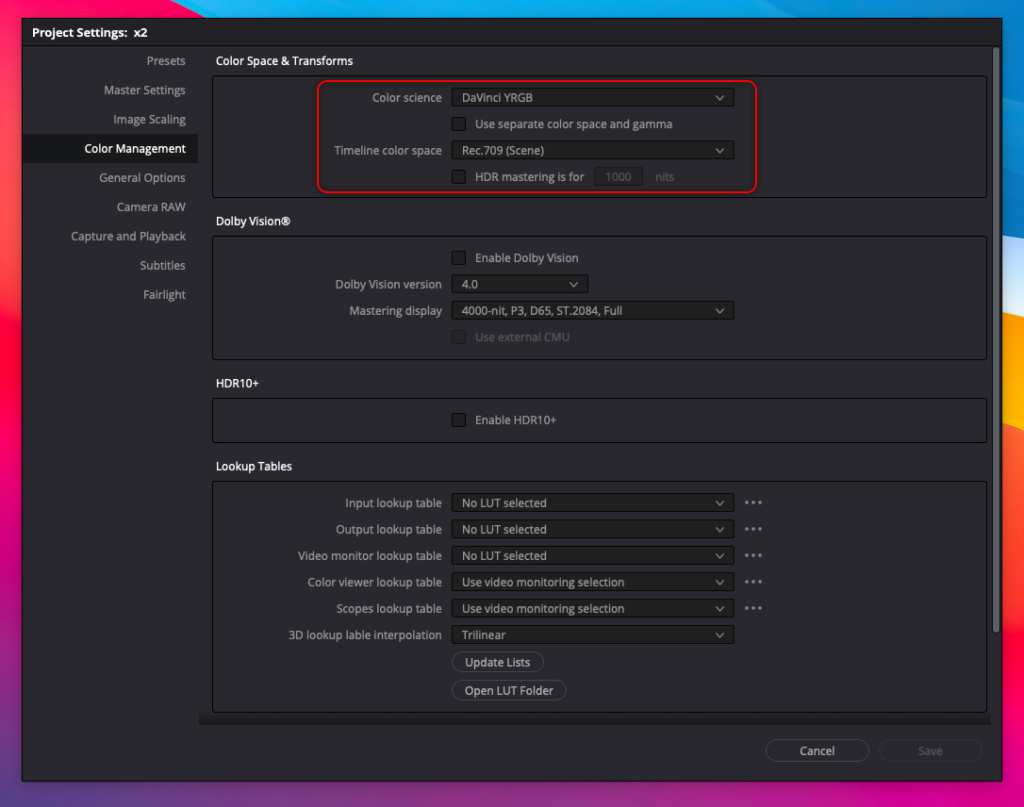
Notice that the Color Management set for the Resolve project is to “DaVinci YRGB” and “Rec.709 (Scene)”:
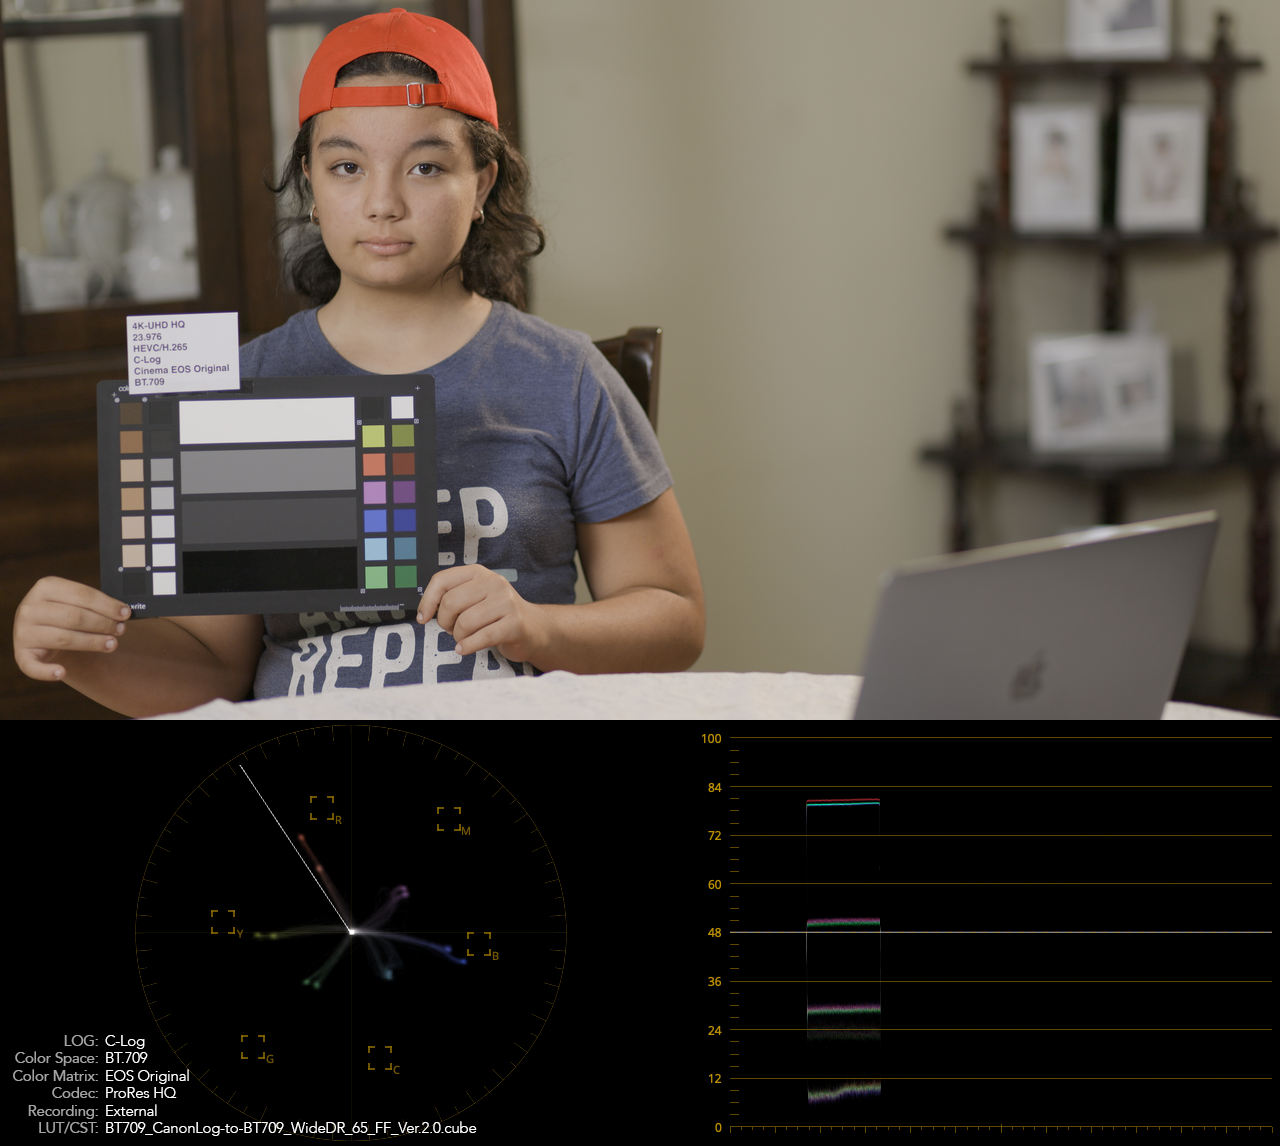
After setting the data levels to full, there is no significant difference between internal to external recorded footage using any color space and any color matrix, any but Cinema Gamut, which for some reason, doesn’t translate very well to the Atomos Ninja V, or maybe to HDMI, and using C-Log 3 with BT.709 has some little tilt in the scopes. In the firs comparison the camera was set to C-Log with BT.709 and EOS Original, the Ninja V was set accordingly, I also applied the Canon lookup tables (LUTs) accordingly, the EOS Original Matrix produces weird colors:

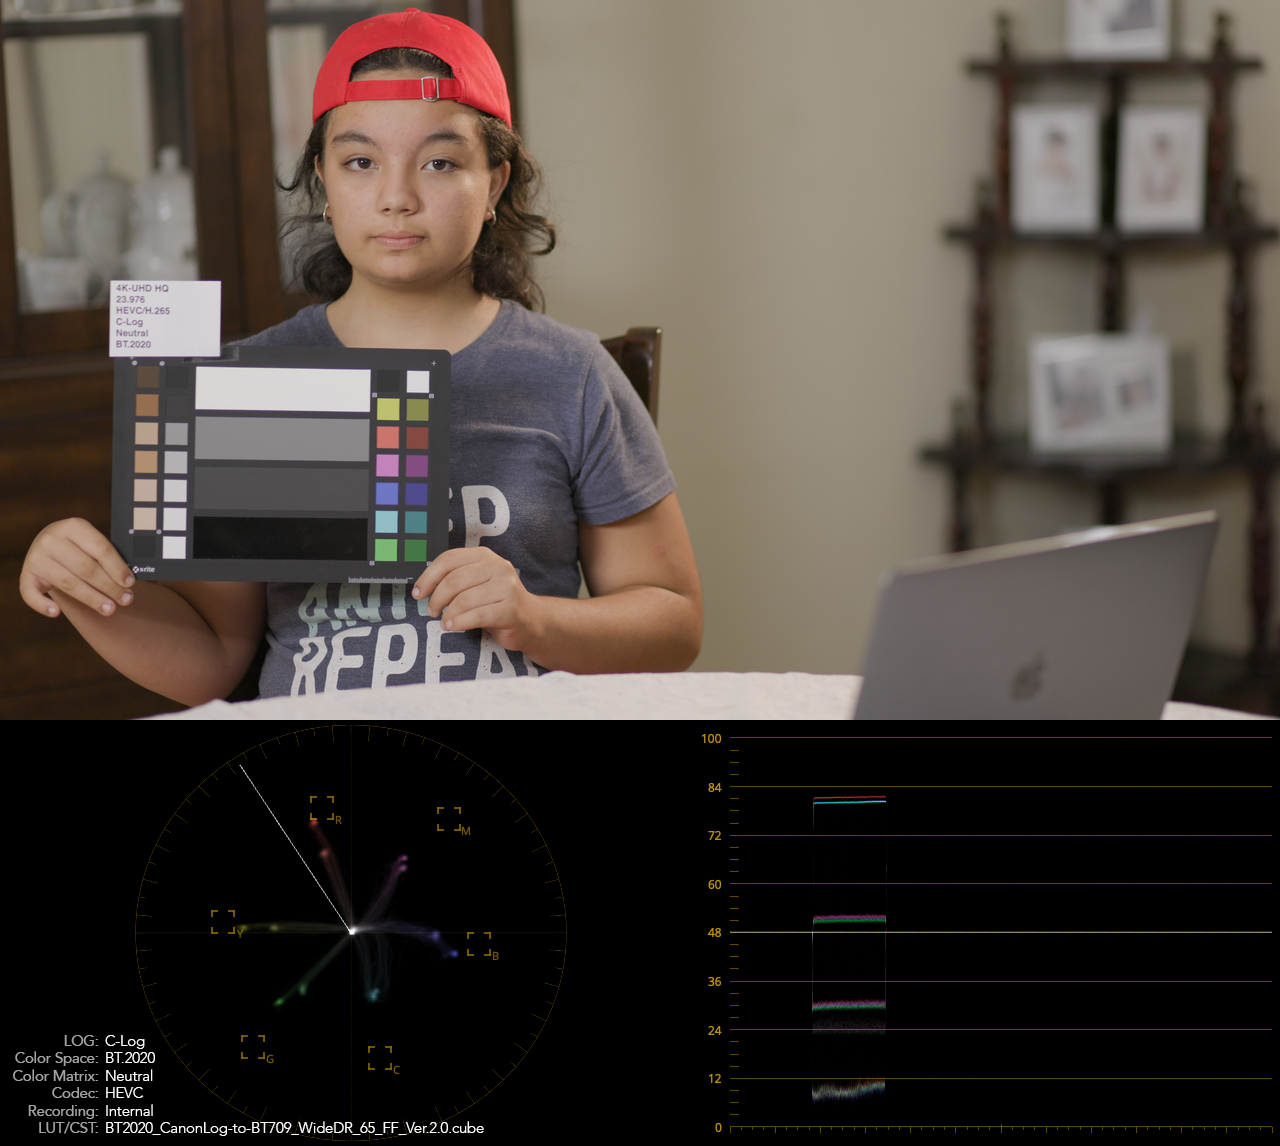
The following comparison between internal vs. external uses C-log, BT.2020, Neutral Color Matrix:

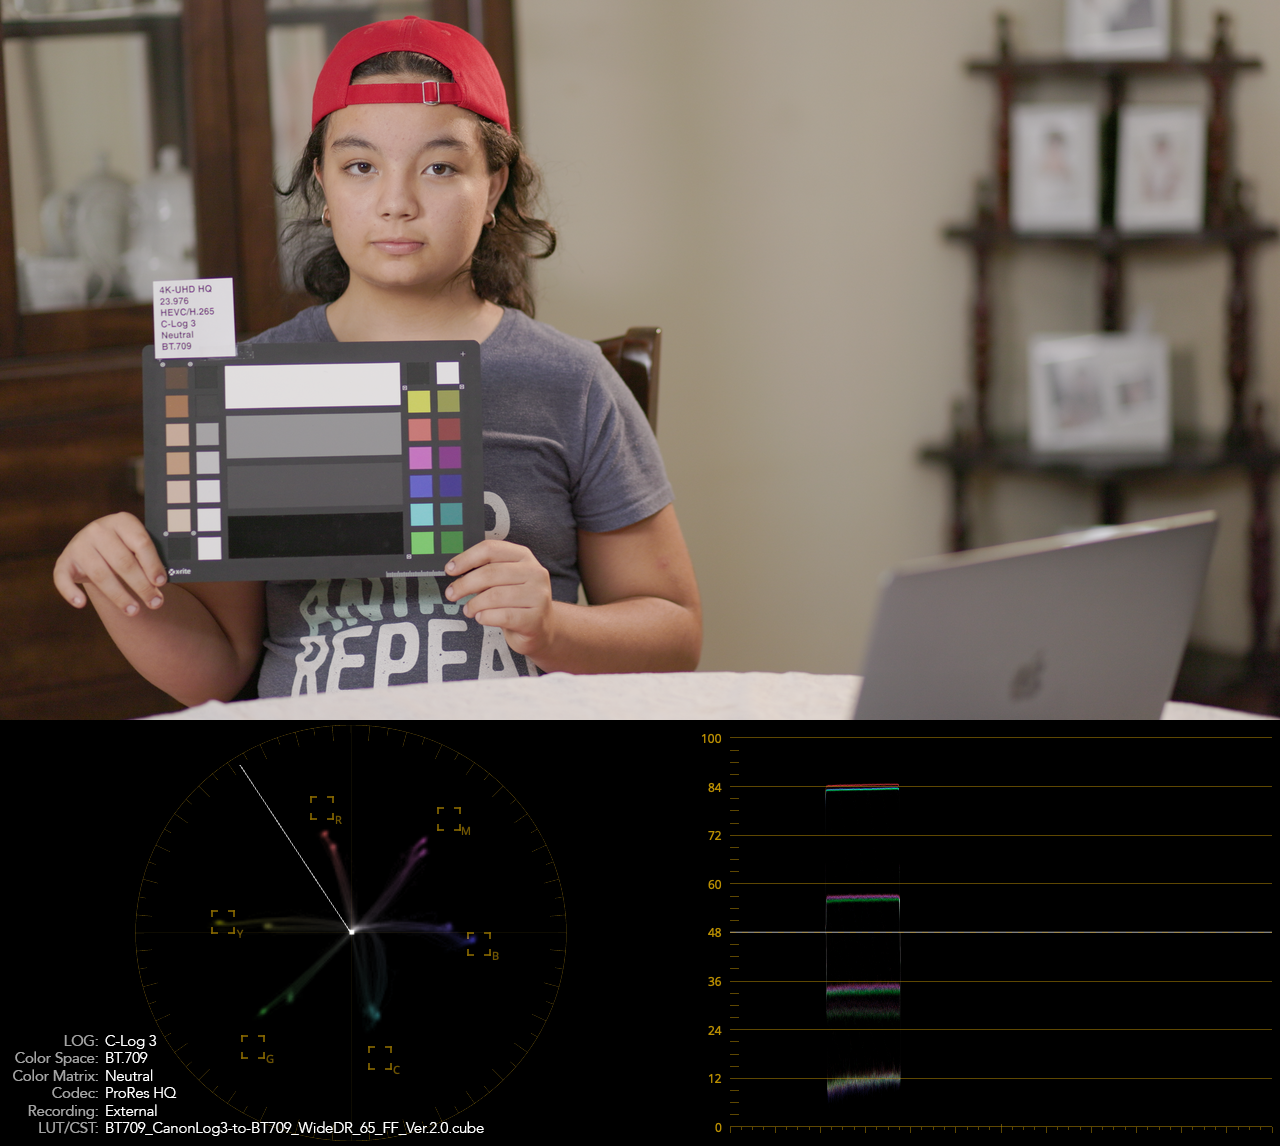
The following comparison between internal vs. external uses C-log 3, BT.709, Neutral Color Matrix:

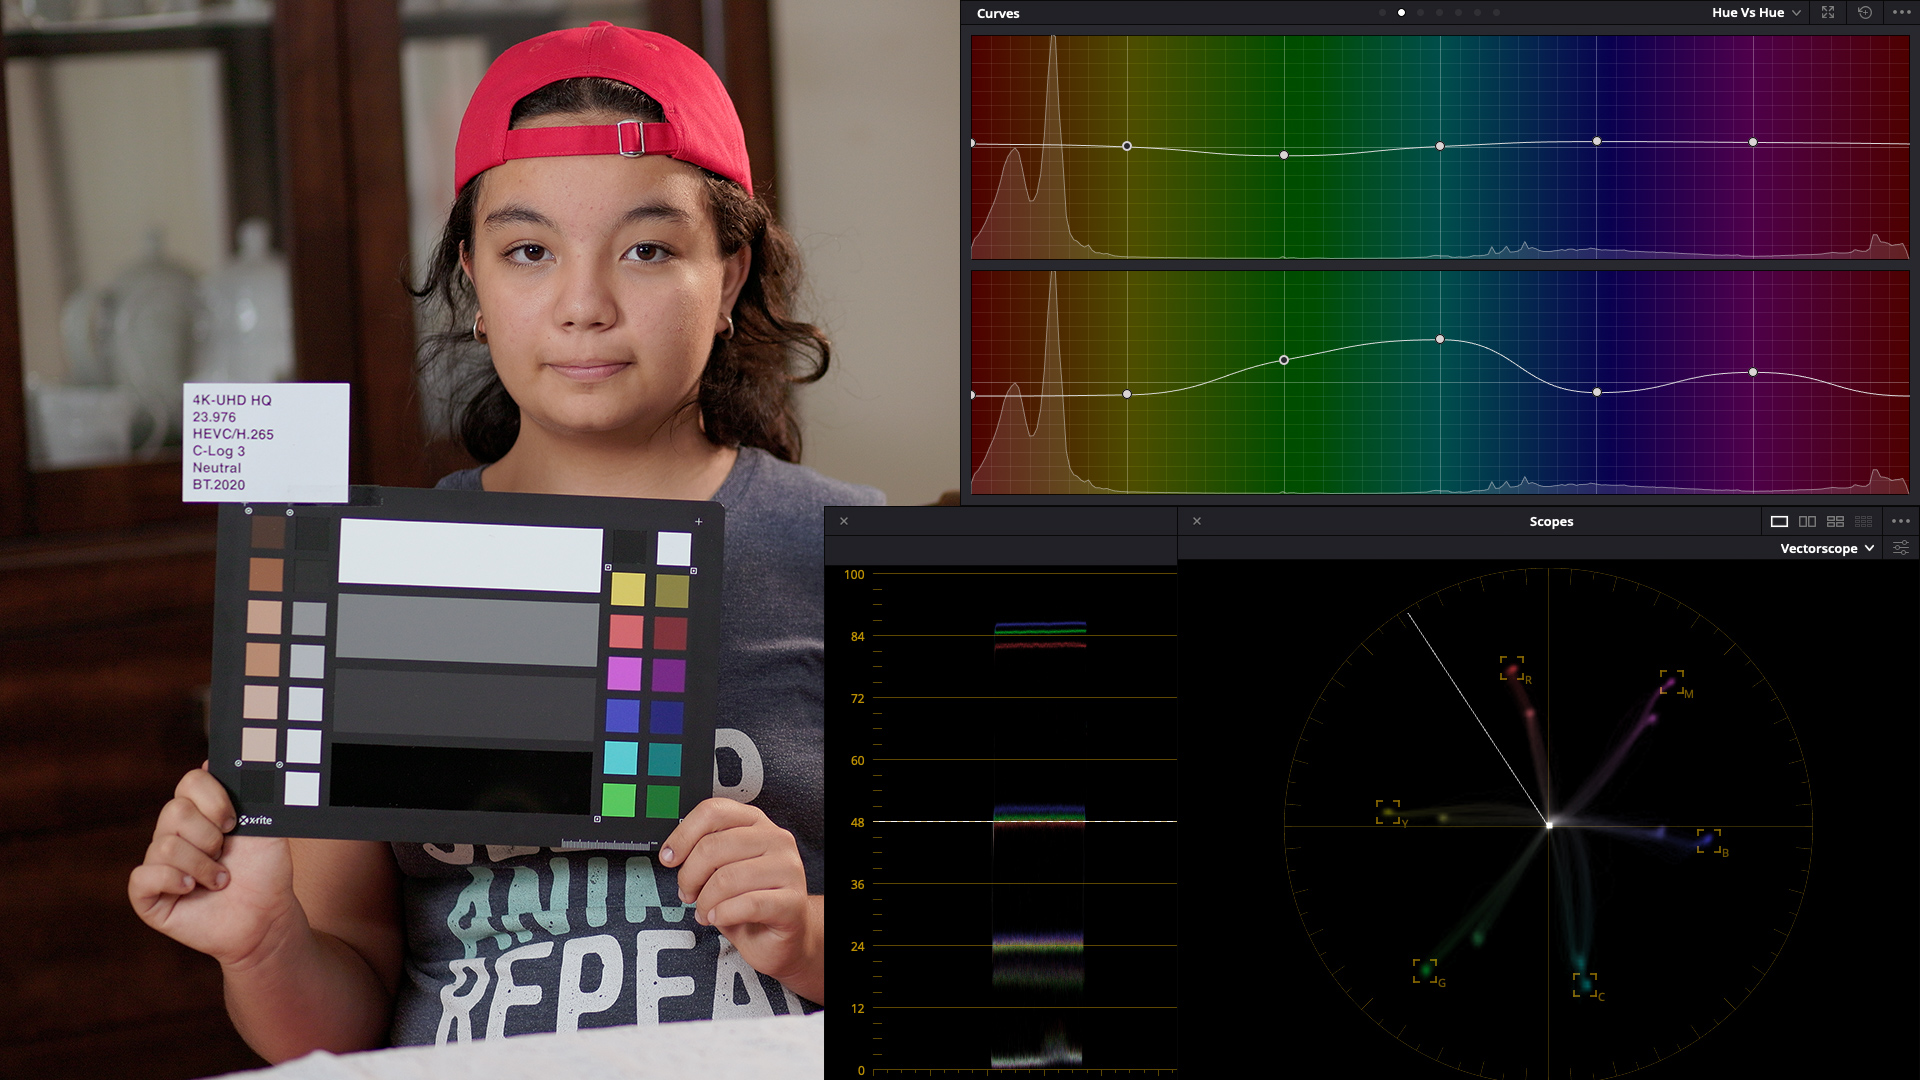
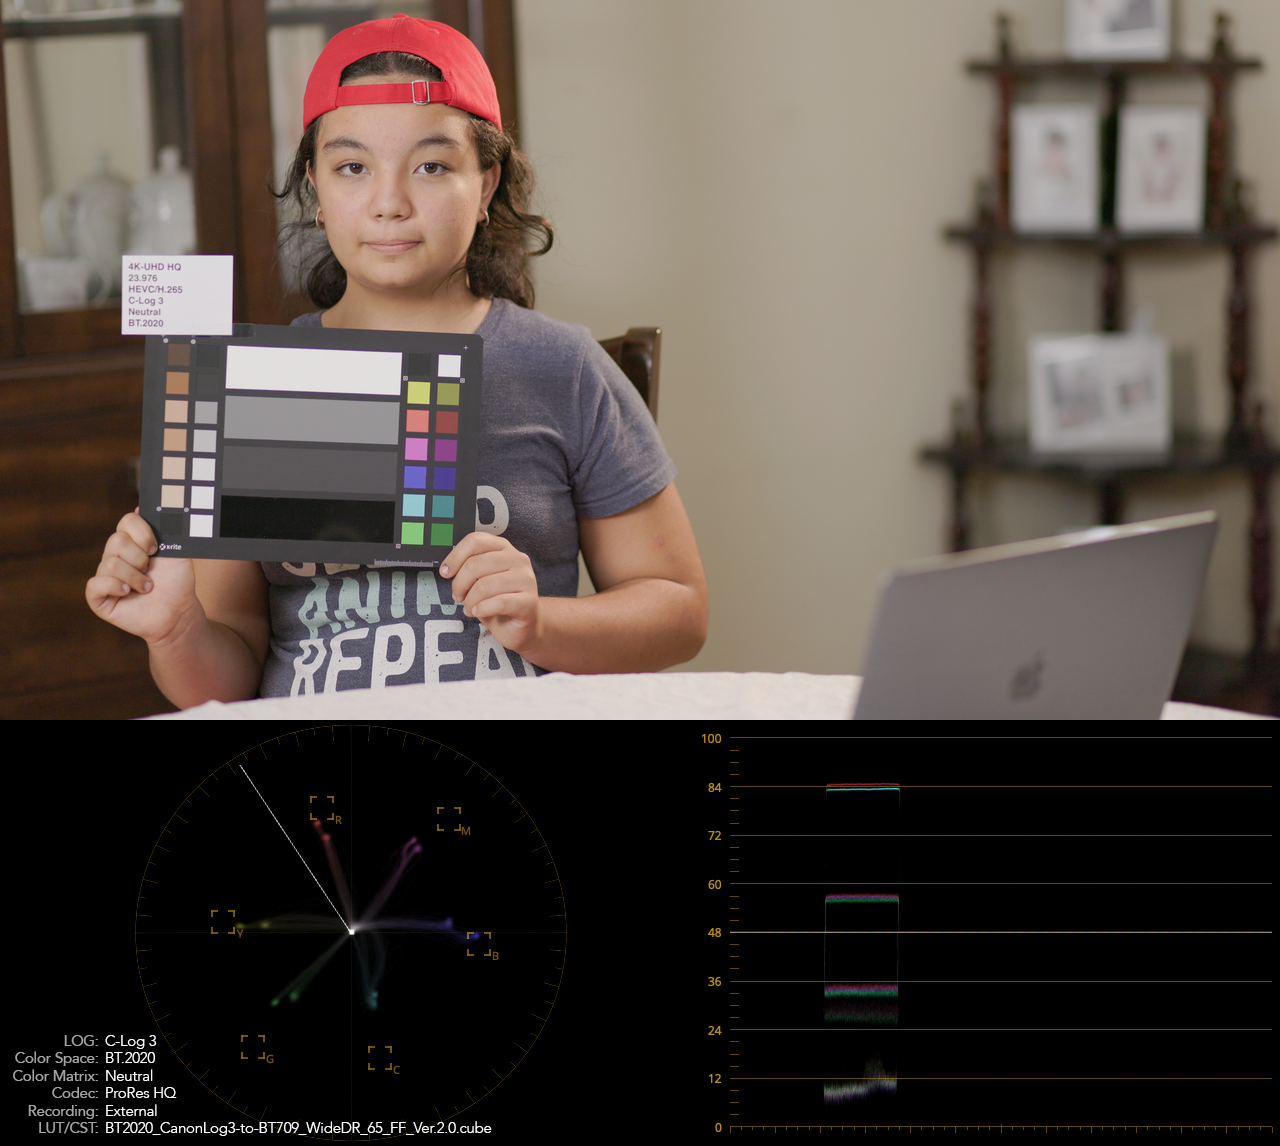
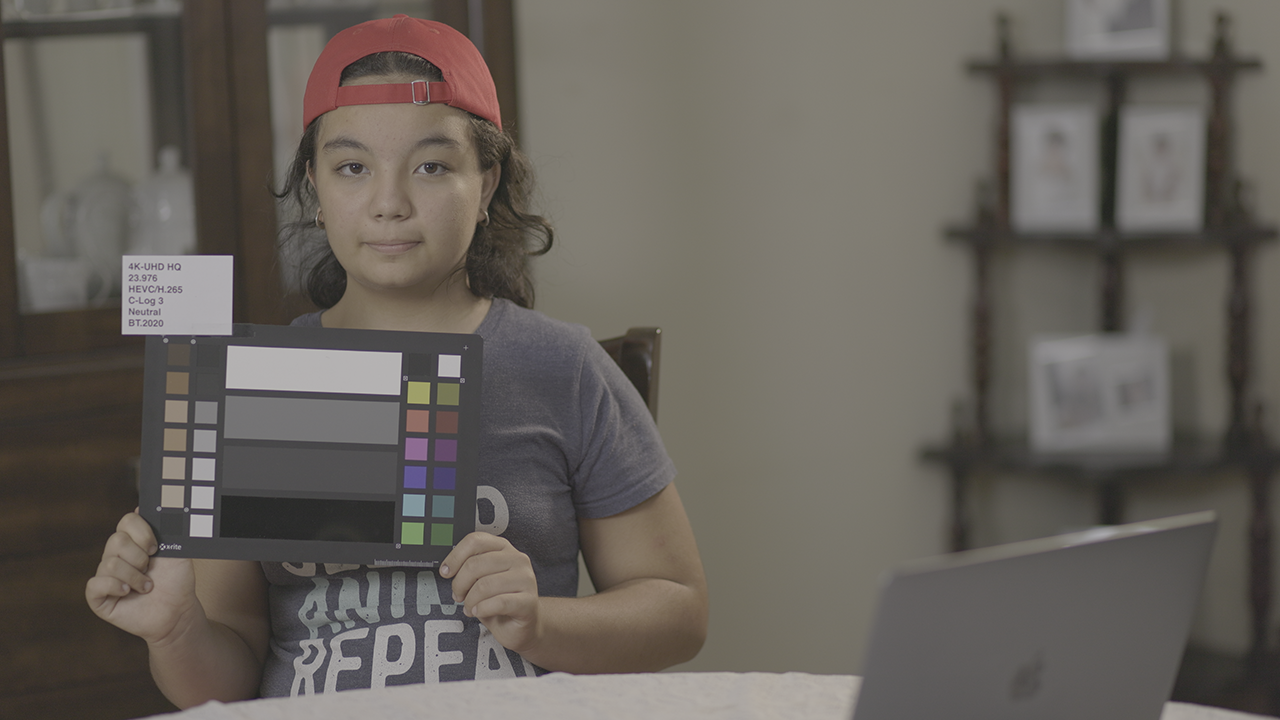
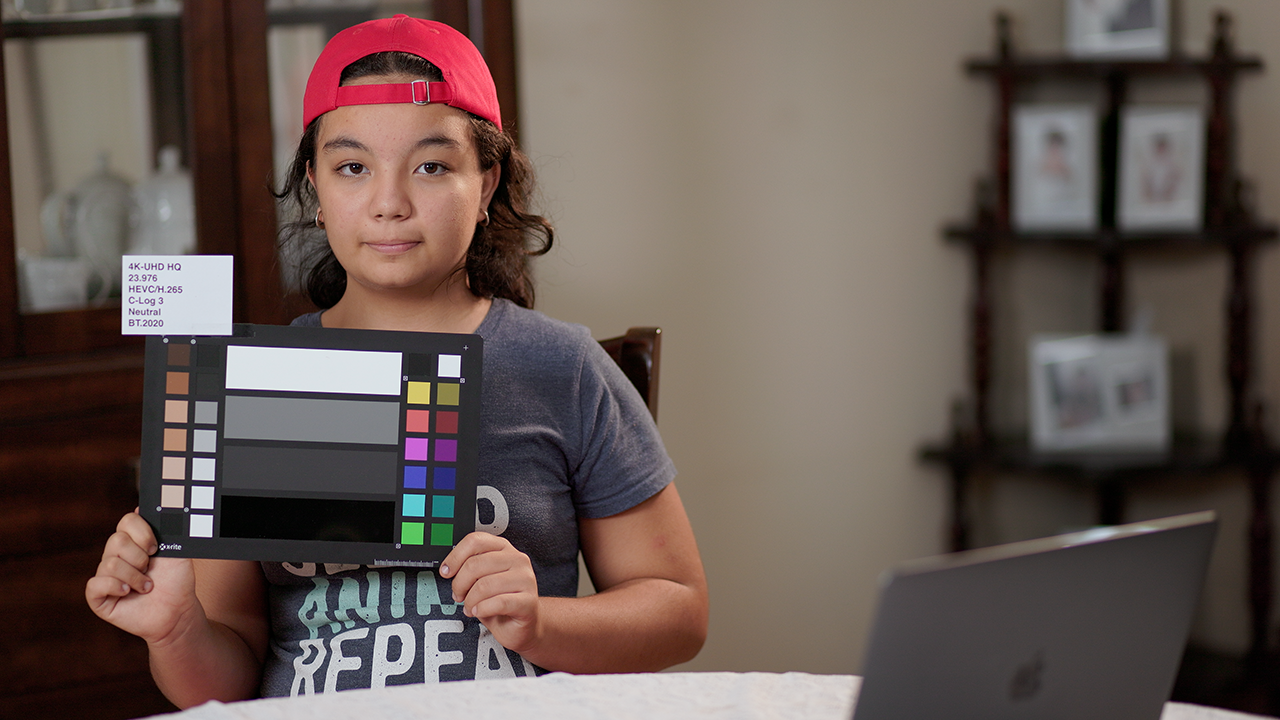
The following comparison between internal vs. external uses C-log 3, BT.2020, Neutral Color Matrix:

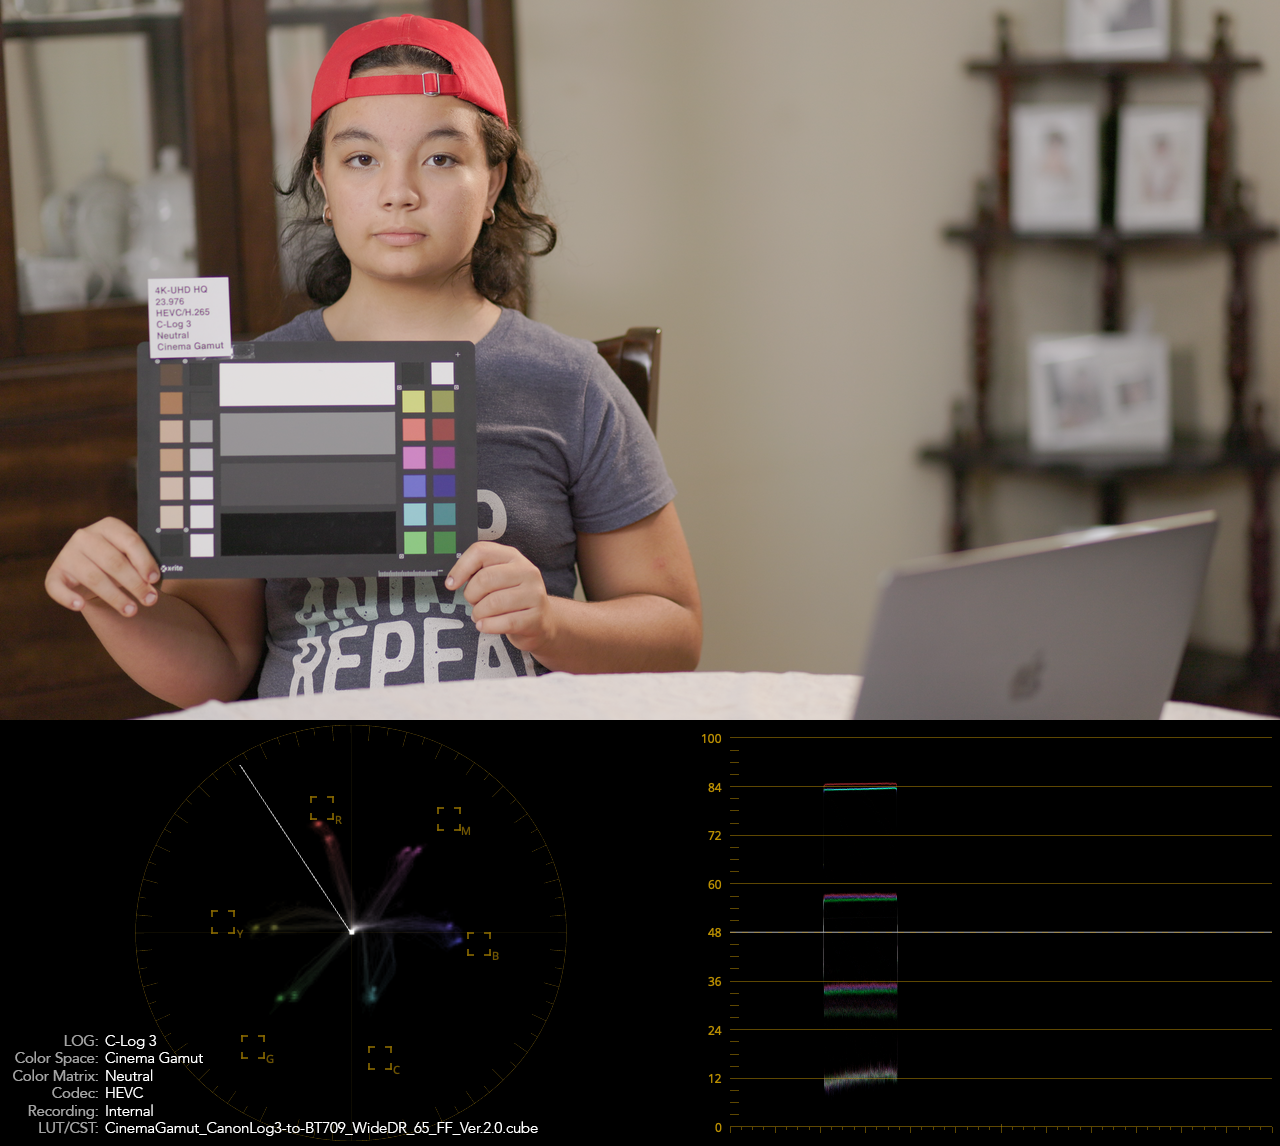
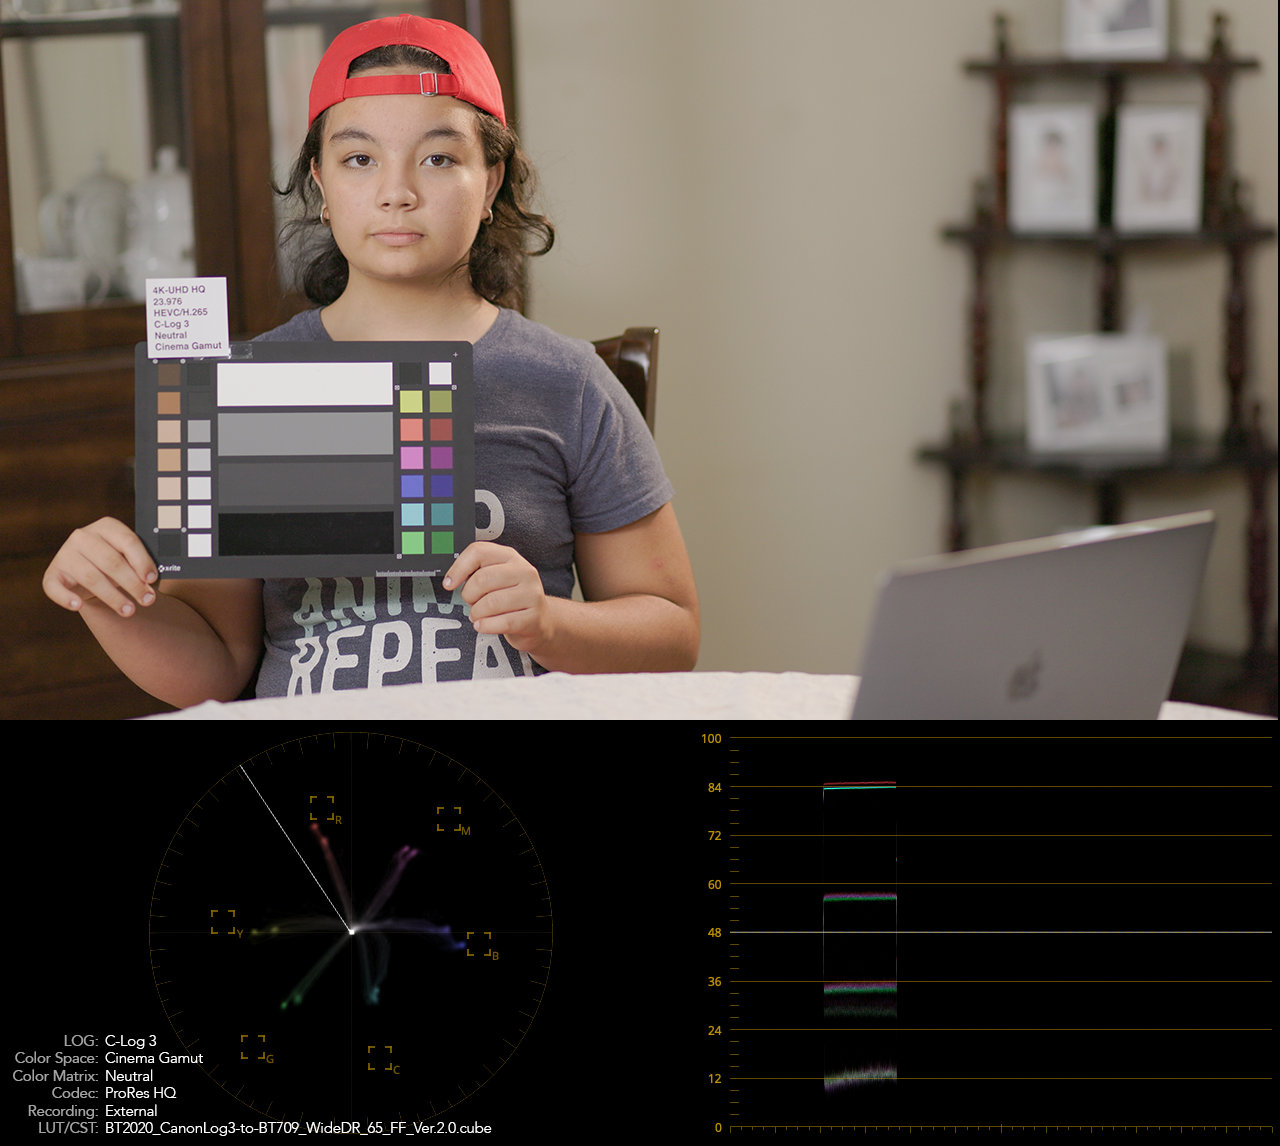
The following comparison between internal vs. external uses C-log 3, Cinema Gamut, Neutral Color Matrix, the external recording color is skew to yellow:

In the case of this external recording, a workaround to make it look as the internal recording, just assume the Color Space is BT.2020, either with the “BT2020_CanonLog3-to-BT709_WideDR_65_FF_Ver.2.0.cube” LUT or with Color Space Transform, same results:
In conclusion: While using footage recorded externally with the Atomos Ninja V, to get almost the same results as with internal recorded footage in Blackmagic Design DaVinci Resolve 17, set the “data levels” to “full”, and if you used the Cinema Gamut on the camera, just assume it is recorded using BT.2020 color space.
LUTs vs. Color Space Transform
Most people doing color correction and grading use Blackmagic Design DaVinci Resolve 17 because the is simply the best tool to do so, and most people doing color correction and grading recommend using the “Color Space Transform” instead of using Canon lookup tables (LUTs) considering that LUTs can clip the footage if the grading is done outside the node where the LUT is applied, so let’s see how much difference is between them. The following example uses internal recorded footage using C-Log 3, BT.709, Neutral color matrix and has the LUT and Color Space Transform assigned accordingly, the main difference can be seen in the shadows, almost one stop different, and in the color saturation:
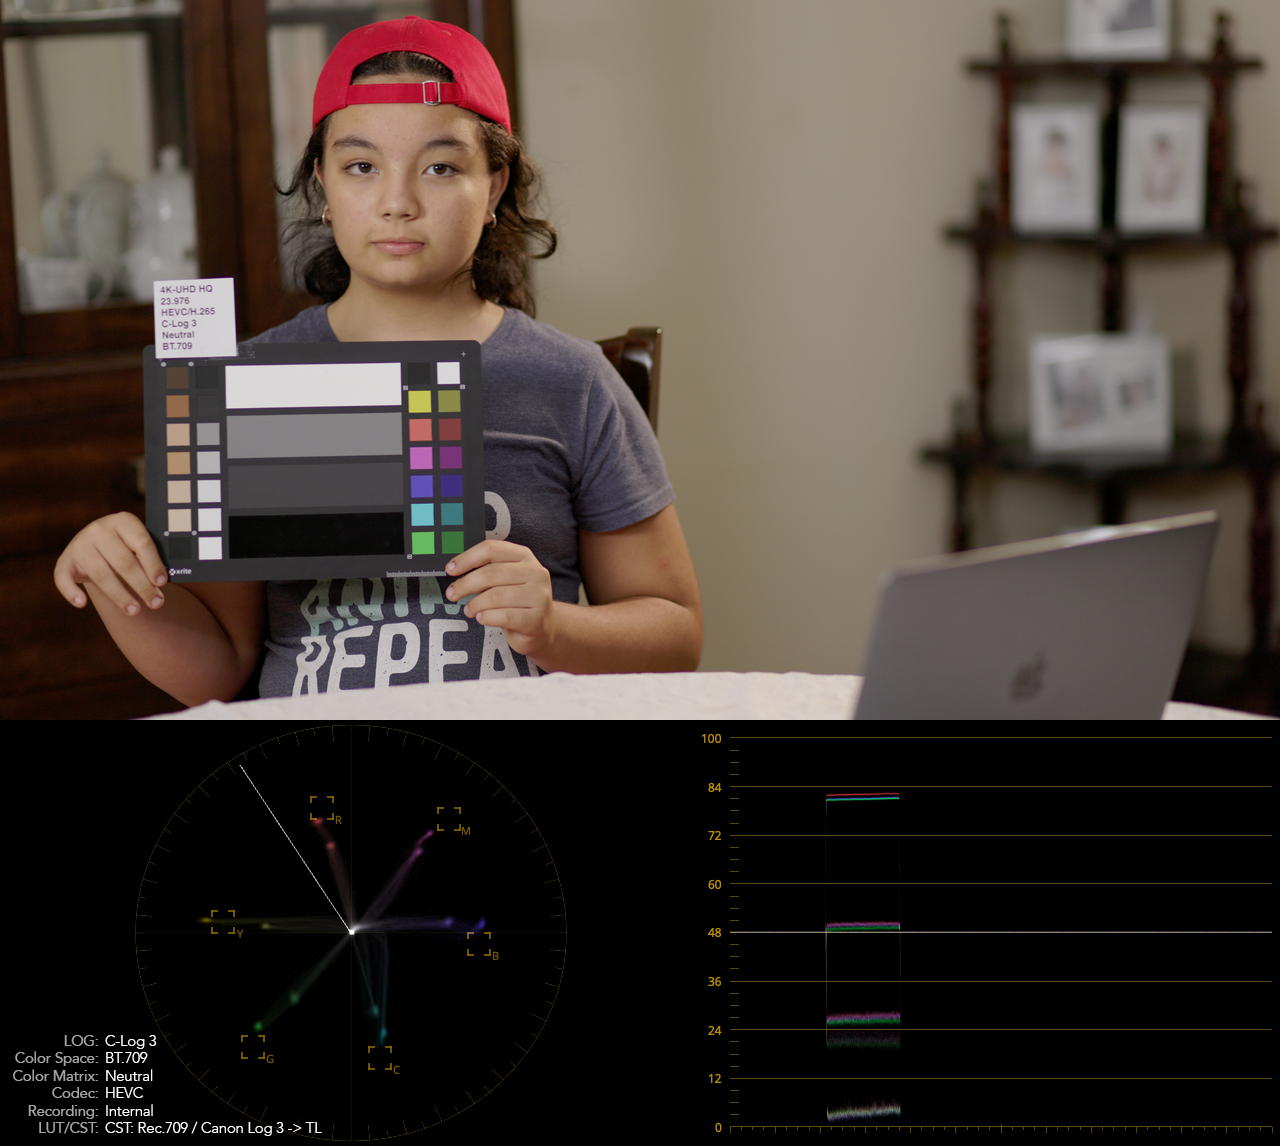
The following example uses external recorded footage with the “full range” data levels set, using C-Log 3, BT.709, Neutral color matrix and has the LUT and Color Space Transform assigned accordingly, the main difference is again, almost a stop of light in the shadows and saturation, and this is the closest example of a Color Space Transform fitting the desired output based on the chart:

Conclusions
- Internal and external recordings without the “legalize” option, work almost the same while setting the data levels to “full” in Blackmagic Design DaVinci Resolve 17, if Cinema Gamut is avoided, no workaround at this time in Final Cut Pro and Adobe Premiere.
- If Cinema Gamut was used to record externally, the color will look bad, using both, LUTs and Color Space Transform, a workaround is assuming that BT/Rec.2020 was used, either with LUTs or with Color Space Transform.
- Even though BT/Rec.2020 offers more latitude, for some reason, using BT/Rec.709 combined with C-Log 3 produce footage that fits the closest to the color chart.
- The best settings for the EOS R5 combined with the Atomos Ninja V are: C-Log 3, Neutral color matrix, and BT.2020 color space.
Here is my final result
Extra notes and freebies
- C-Log requires ISO 400 for best dynamic range, C-Log 3 requires ISO 800.
- I exposed using false color on the Atomos Ninja V using the corresponding Canon lookup tables (LUTs), I also used manual white balance with the RGB Parade on the Atomos Ninja V.
- The output color space in every “Color Space Transform” was set to “Use timeline”.
- All samples used, internal, external RAW, etc., a C-Log 3 / BT.2020 LUT and Resolve Powergrade are available for download clicking here.

Cinema Gamut skews yellow because HDMI is only coded to the BT2020 color gamut, not Canon’s wider but proprietary Cinema Gamut standard. As for FCP, YES it can ingest BT2020 or Cinema Gamut perfectly accurately. All one must do is adjust the Library settings to wide gamut/HDR from SDR. Afterward all Canon LUTs work fine, with C-Log 3 being the best option for the R5 in terms of leveraging it’s hidden dual base ISO (800/3200) to capture max dynamic range footage. It’s actually much easier than Davinci to grade, which is why I ditched Davinci, in addition to a Black Magic exec’s email me confirming that they have zero plans to add ProRes Raw support to Davinci. And if you are leveraging the terrific advantages of the Atomos recorders to record R5 footage (like the ability to change ISO, color space, exposure, etc. in post (which Canon Raw files do not offer in FCP but do in Davinci — and MUCH smaller Raw file sizes and editing/correction/grading speed) then FCP is the only option unless you like transcoding your Raw footage into ProRes or some other non-Raw format.
Indeed, I cover that facts in this article:
https://rodrigopolo.com/2021/11/17/eos-r5-atomos-ninja-v-a-thorough-analysis-and-how-to-set-up/