Exposing x-log using false colors
Check the Ultimate Atomos Ninja Setup Guide for Canon and Sony Cameras: https://youtu.be/iv3rreK0D9Q
There are plenty of tutorials online teaching on how to expose video, there are many ways to achieve this, using the camera exposure indicator, the histogram, using luma waveforms on an external monitor, and the most accurate and simple way I have found, using false colors.
The main issue while exposing for log has to do with how each log profile is designed, some log profiles are designed to expose to the left or to the right, and many times depends on what you want to achieve, keep detail in the highlights or the shadows, for this reason some log profiles state that the medium gray should be exposed to a fixed IRE value, but using this technique you can forget about all the technicalities and see the result right in a monitor or in an editing software, so first, what is needed:
- A gray card, which are cheap on Amazon.
- Some light source, from a cheap light kit (which I recommend to replace the neon lights with led lights), to a more expensive led light kid, even light from a window if you are producing in a budget.
- A DSLR/Mirrorless camera that can record in log and better if has HDMI video output, I’m using the EOS R with EF to RF adapter and the well known Sigma 18–35mm f/1.8 lens.
- Your camera Log-to-Rec.709 LUT, in my case i downloaded the “Canon lookup table Version 201911” available in the support page, I have also tested the Sony α7 III and used the Ground Control free Sony S-Log 3 to Rec.709 LUT.
- An HDMI monitor that has false colors and can load LUTs, I recommend the Atomos Ninja V and if you have extra money, get the full kit.
- The IWLTBAP free false color LUTs, you’ll love this.
Setting-up your camera and using a monitor
Of course you’ll need first to have your set well lit and ready to go, so lets go to the camera and monitor, the best way to achieve the perfect exposure is using a monitor, don’t worry if you don’t have one, I’ll show you how to expose without a monitor later in this article. First, let’s get the camera settings right, I’m using the EOS R for this example, so here are my settings:
- True 24fps frame rate.
- 1/50s shutter speed (the closest to a 1/48 using the 180° rule).
- C-log enabled (either 8bit or 10bit).
- ISO 400 for C-log.
- ƒ/1.8 aperture, but this is my personal choice.
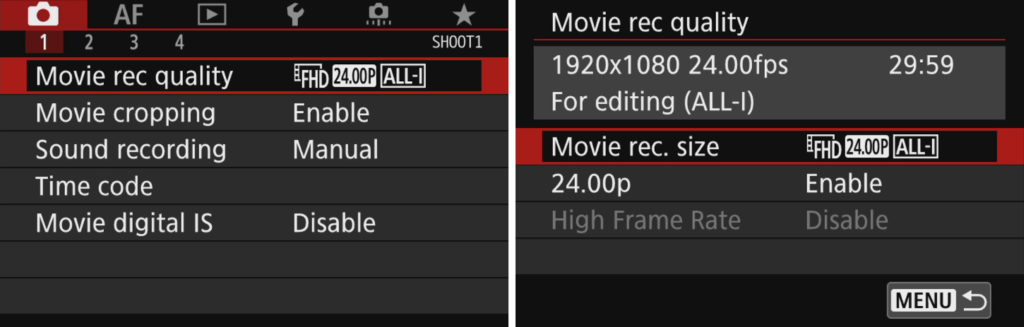
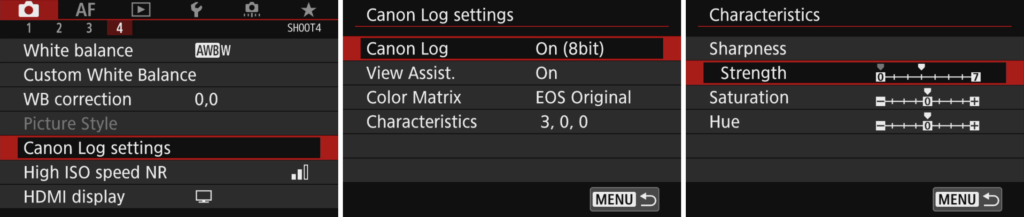
I choose to record in FHD 1080p in crop mode without any digital image stabilization, it uses the same 4K-UHD sensor area with the same 1.75x relative HFOV crop factor and delivers sharper results. I also choose a value of 4 in sharpness using C-log and the View Assist on.
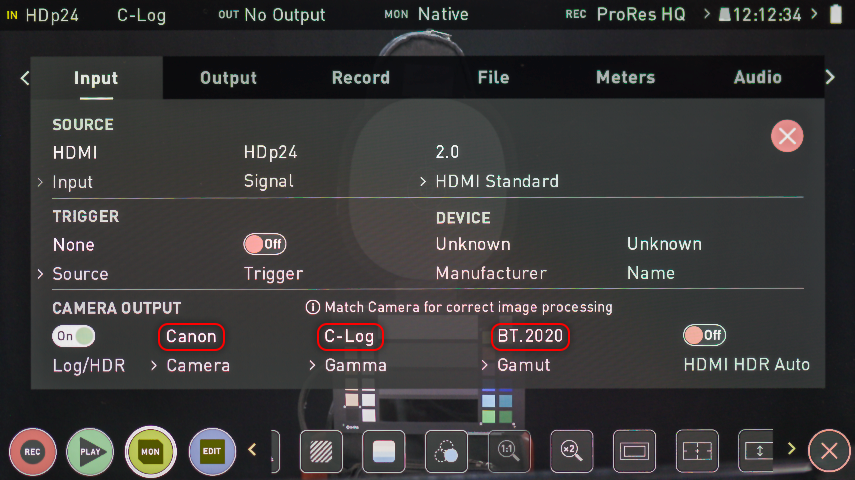
Now let’s copy the Log-to-Rec.709 3D LUT into the monitor disk, in the case of the EOS R is the BT2020_CanonLog-to-BT709_WideDR_65_FF_Ver.2.0.cube file, insert the disk into the Atomos Ninja V, power on the monitor and the camera, connect both, and setup the monitor, and then, in the input tab, in “source”:
- Log/HDR: On
- Camera: Canon
- Gamma: C-Log
- Gamut: BT.2020
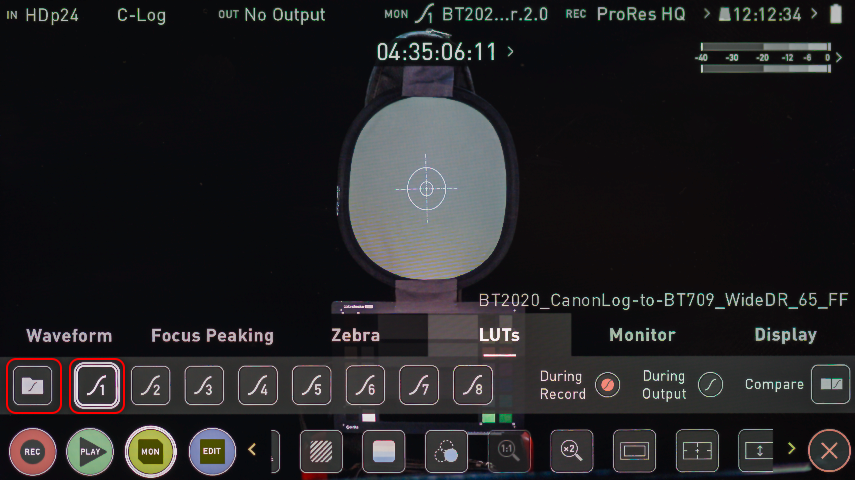
In the top of the monitor, tap under “MON” to open the monitor settings, select the “LUT” options and then tap the “LUTs” subtab:
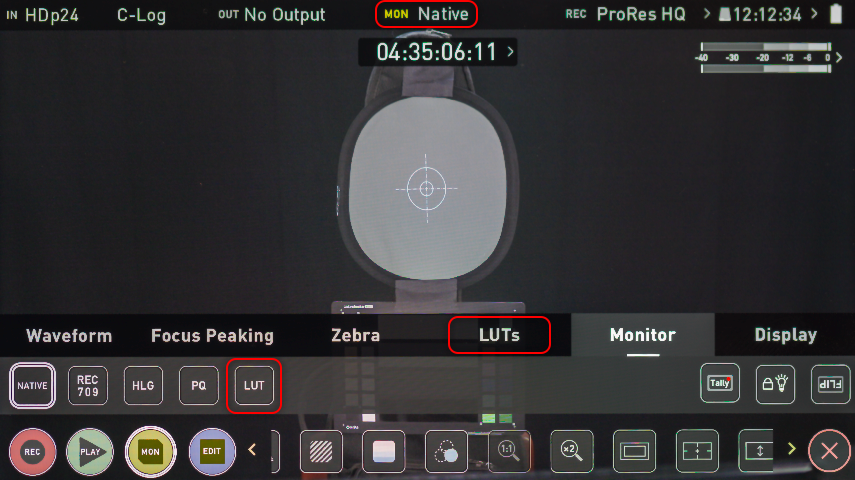
Tap the number of LUT you want to have your Log-to-Rec.709 LUT, and tab the folder icon to open the file dialog where you can choose the LUT file to load:
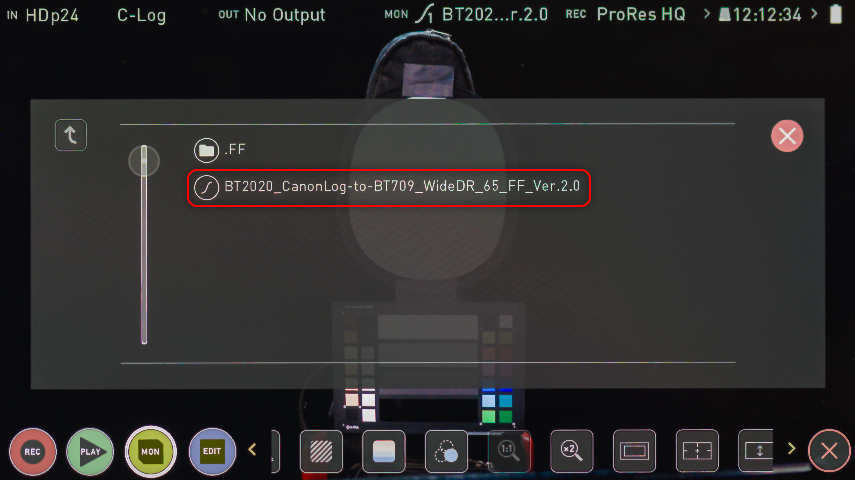
Double tap over the LUT file:
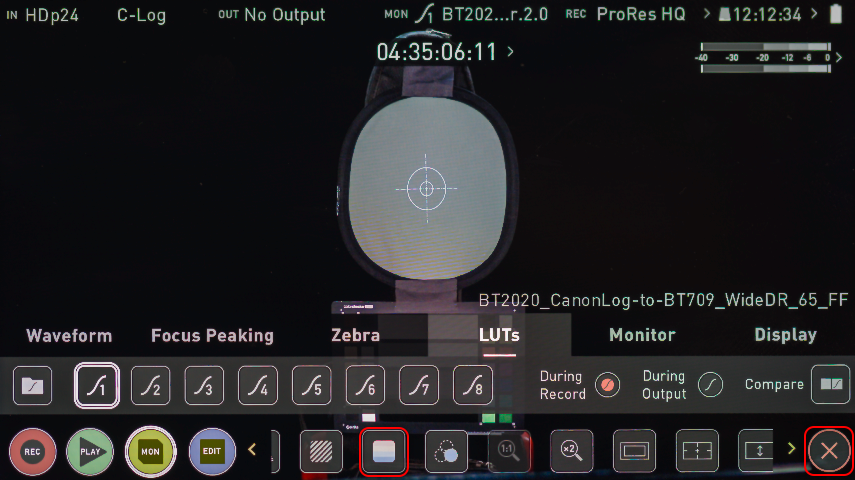
And you are done, now you are recording C-Log but previewing the image as Rec.709, and over that preview you enable the false color visualization by tapping over the false color icon:
Now, the 50% gray card is the point of reference for the exposure, it needs to fit in the middle of our explosion color chart, which apear at the left side of the screen:
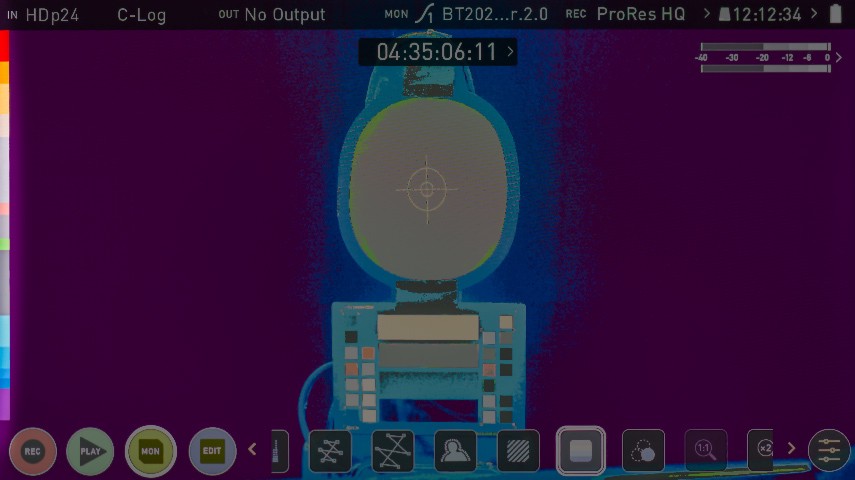
Here is a chart to understand which shade of gray is the middle gray, which is between the green and salmon color:
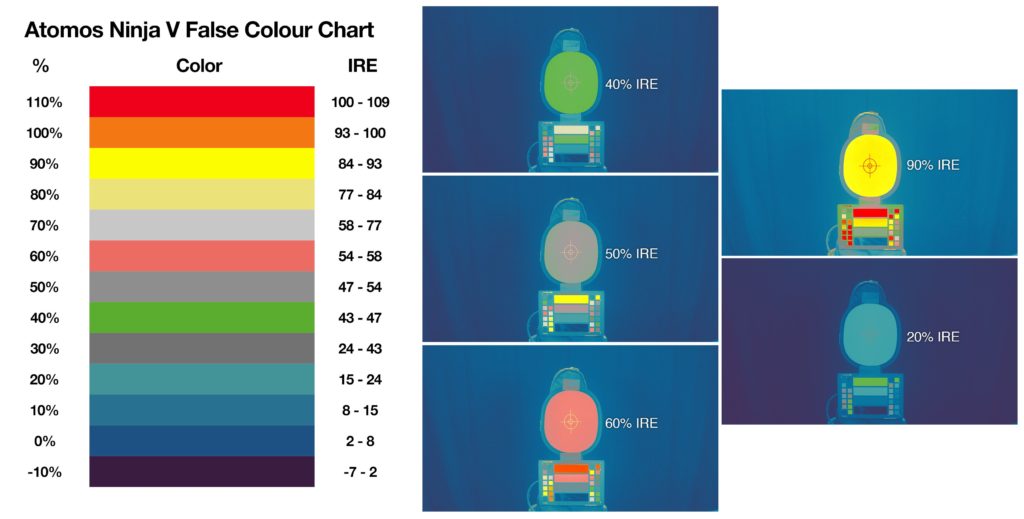
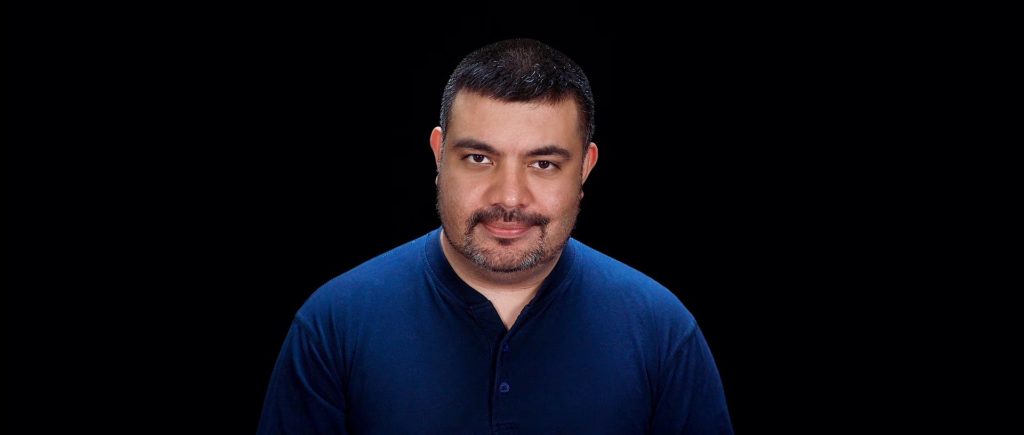
The best exposure is the 50% IRE for the gray card, but if you want to expose to the left or the right, go ahead and push it to 60% or 40%, but avoid going to crazy. Here is a snapshot the result, using the same Canon LUT in Adobe Premiere with minor adjustments:
Exposing with the IWLTBAP free false color LUT
If you don’t have a monitor, don’t worry…
- Setup your scene and camera settings.
- Record a piece of x-log video and then import the video to your editing software, I’ll use a C-Log video from the EOS R camera.
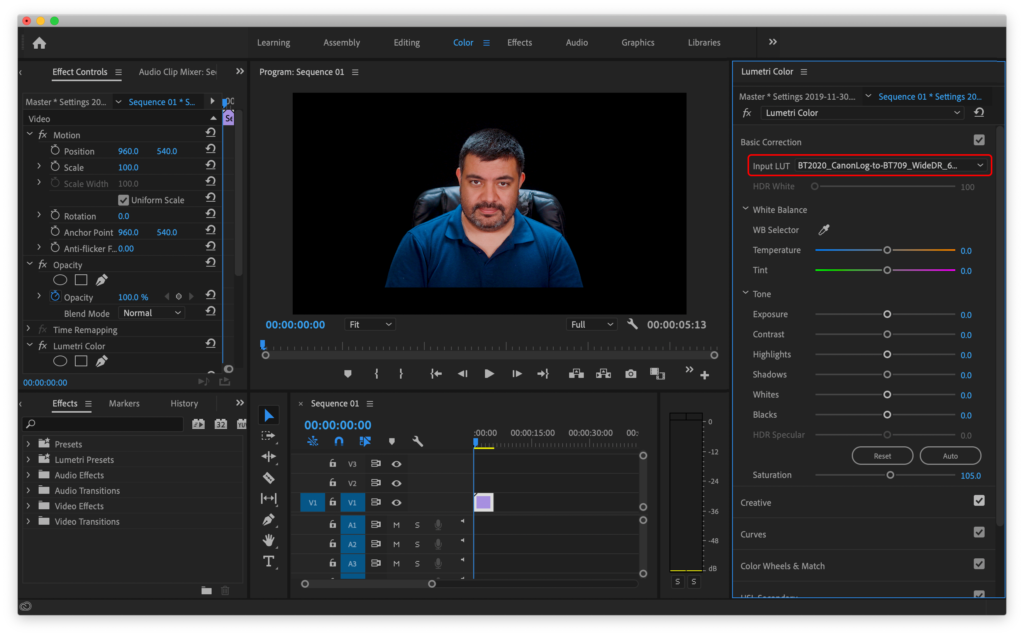
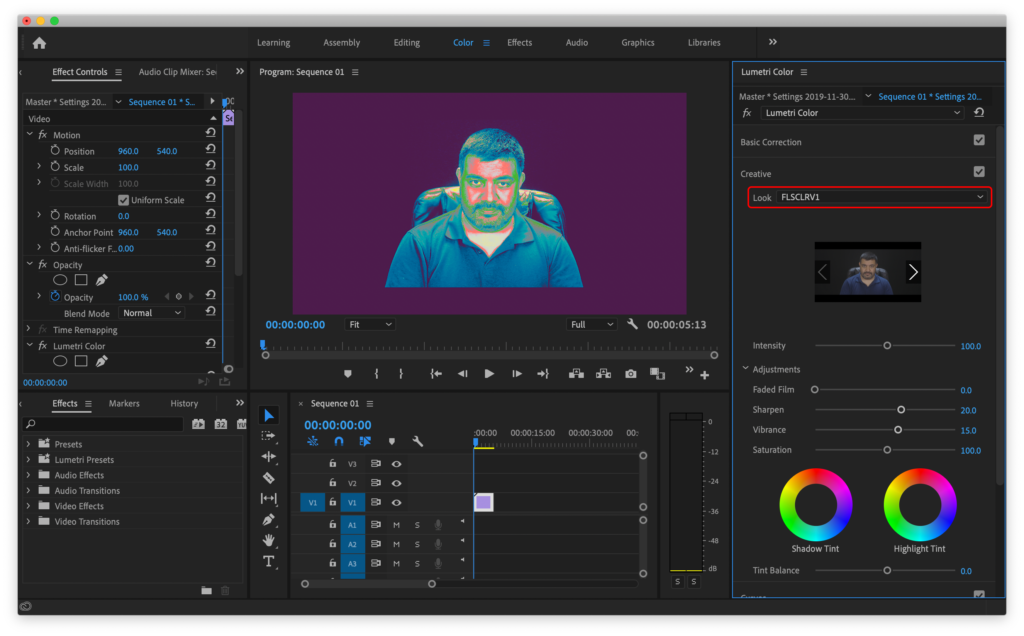
- Using Adobe Premiere CC, select your video in the timeline and in the “Color” workspace, select the “Lumetri Color” tab, the first option under “Basic Correction” is “Input LUT”, select your Log-to-Rec.709 LUT, in my case, the BT2020_CanonLog-to-BT709_WideDR_65_FF_Ver.2.0.cube file, this will present your video from log to rec.709 color.
- In the “Lumetri Color” tab select the “Creative” area and in “Look” select the the IWLTBAP free false color LUT file “FLSCLRV1.cube”, now you can see your exposure in false color, compare it against the color chart to know the IRE values.
Without a monitor you’ll have to do a trial and error method , while recording, you could make different adjustments with different exposures to have a bunch of clips and then check the exposure with this method.
Hope this help you know how to do a great exposure with any Log profile using false colors.
My last post in Medium
This is a copy of my last post on Medium.com; I love tech, I used to love all social media and develop for them, but non-reciprocal love is something poisonous and plain stupid. I had an account in Spanish in that platform, @RodrigoPolo, but it got suspended because I used hyperbolic language, and as you’ll know, left-leaning progressive people in Silicon Valley understand nothing about sarcasm and humor. In the other hand, Medium was build by the very same people that build Twitter, and after almost 10 years on that social network, while I was promoting the use of that social network in my country, I got suspended without any justification, I wrote an open letter about that at that moment. So after all this mistreatment, I decided to stop publishing in Medium and start publishing here, RodrigoPolo.com, this was my last post there, thank you to all the people who enjoyed and found that space useful.