
EOS R5 + Atomos Ninja V… a thorough analysis, and how to set-up
Check the Ultimate Atomos Ninja Setup Guide for Canon and Sony Cameras: https://youtu.be/iv3rreK0D9Q
Since the release of the Canon EOS R and the endorsement Matti Haapoja did to the Atomos Ninja V, I’m trying to get the best results with this combo, but the lack of documentation from both, Canon and Atomos, the terrible job Atomos team did on their “setup guide” which BTW, is completely misleading, adding to the confusion all the all mumbo jumbo and technical jargon Gerald Undone shared in his video encouraging to update the firmware and then with his video trying to explain but doing the exactly opposite, everyone got lost, specially me, as Casey from Camera Conspiracies said, maybe for Gerald this is so obvious that when he tries to simplify things, the message gets lost in translation. So after all that, I did a thorough analysis of the combo recoding samples and testing different configurations, so here are my recommended settings, how to handle the recorded footage in Premiere, FCP and Resolve, and then my conclusions:
My recommended settings
- For external recordings in 4K-HQ and C-Log 3 with the Ninja V:
- Enable 4K-HQ on the EOS R5.
- Enable C-Log 3.
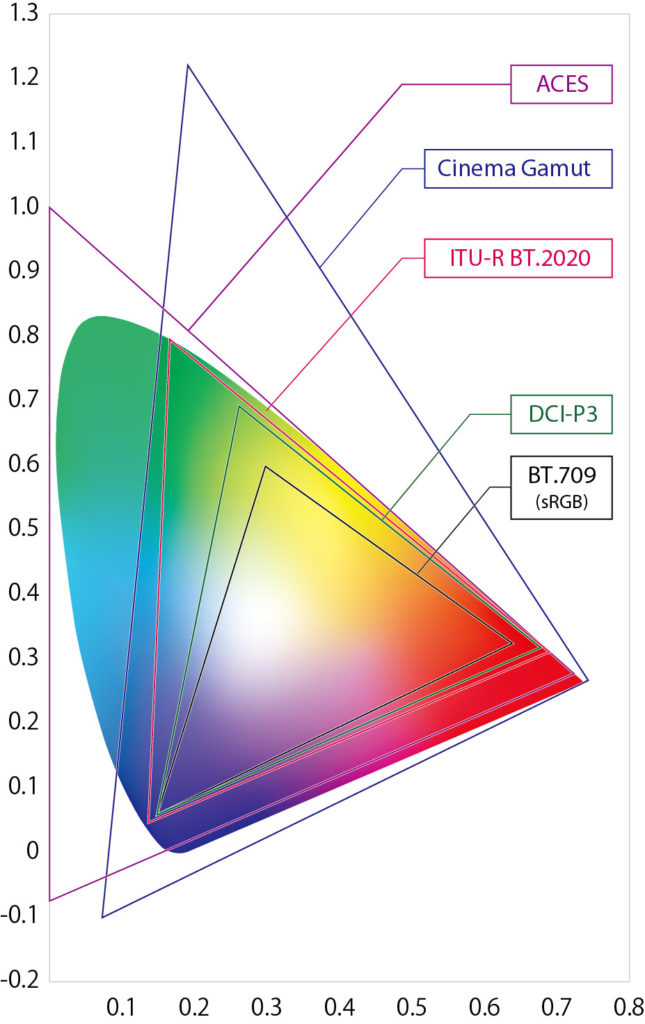
- Use Rec.2020 color space because Cinema Gamut isn’t supported.
- On the Ninja V, load the Canon provided
BT2020_CanonLog3-to-BT709_WideDR_65_FF_Ver.2.0.cubeLUT and enable it to preview your image. - On the Ninja V, enable “Legalize” for exposure and WB, after that, leve it on if you use Adobe Premiere or FCP, turn it off if you use Resolve and then set the video/data levels to full in Resolve.
- For external RAW recording with the Ninja V
- Enable RAW trough HDMI
- Select ProRes RAW codec on the Ninja V
- Load the
CinemaGamut_CanonLog2-to-BT709_WideDR_65_FF_Ver.2.0.cubeLUT and enable it to preview your image for exposure and WB.
- For internal recordings in 4K-HQ and C-Log 3:
- Enable 4K-HQ on the EOS R5
- Enable C-Log 3
- User Cinema Gamut color space
- Record using around ⅓ to 1 stop to the right.
- For internal RAW recordings
- Disable C-Log and use the standard profile, is less nosy and all NLEs would interpret the RAW footage as C-Log 2 / Cinema Gamut
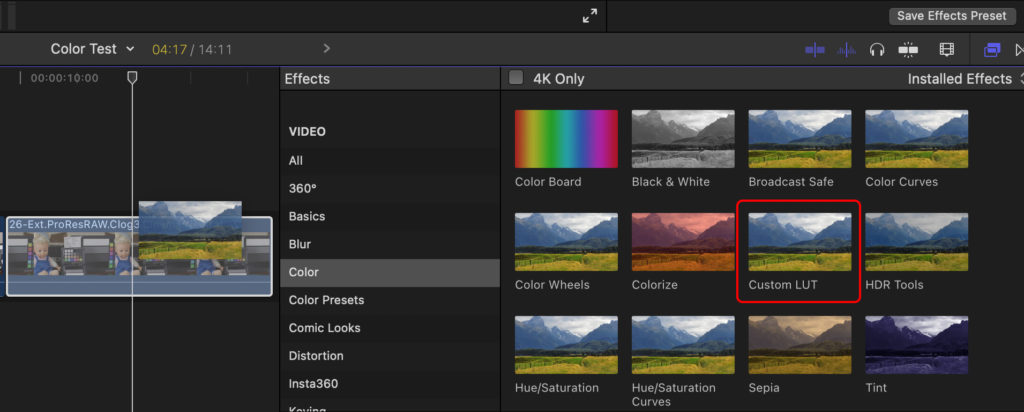
Dealing with the EOS R5 footage in Final Cut Pro
If you are thinking of editing EOS R5 internal RAW footage, you’ll need the Canon RAW Plugin 2.4 for Final Cut Pro, it is available for download in Canon’s support page.
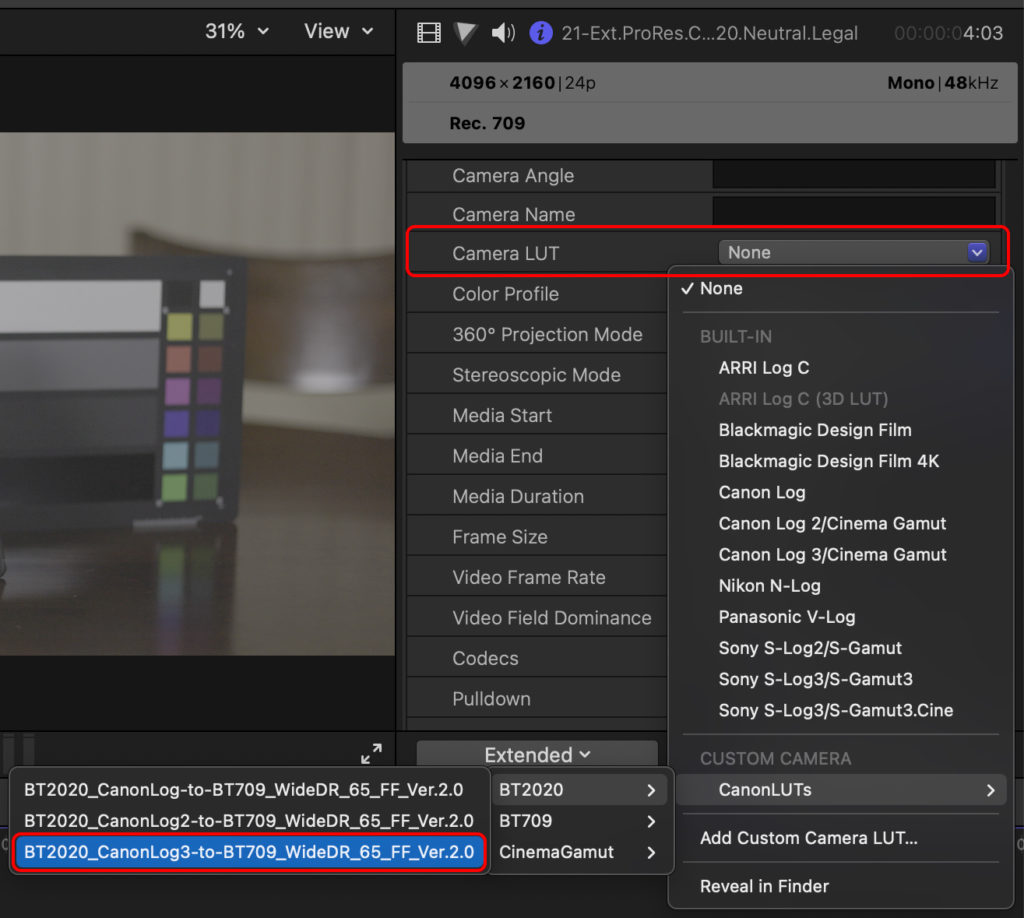
Ninja V External recording using C-Log 3 in Rec.2020 with the “Legalize” toggle on
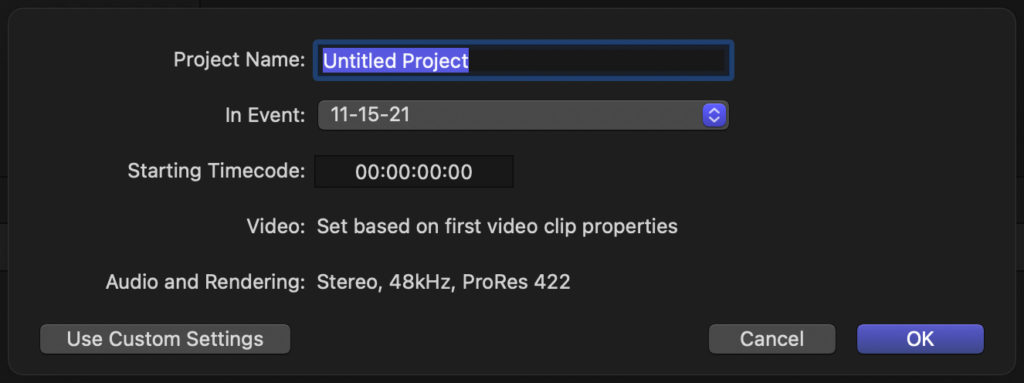
- Create a new project with standard settings.
- Drag your footage to your timeline.
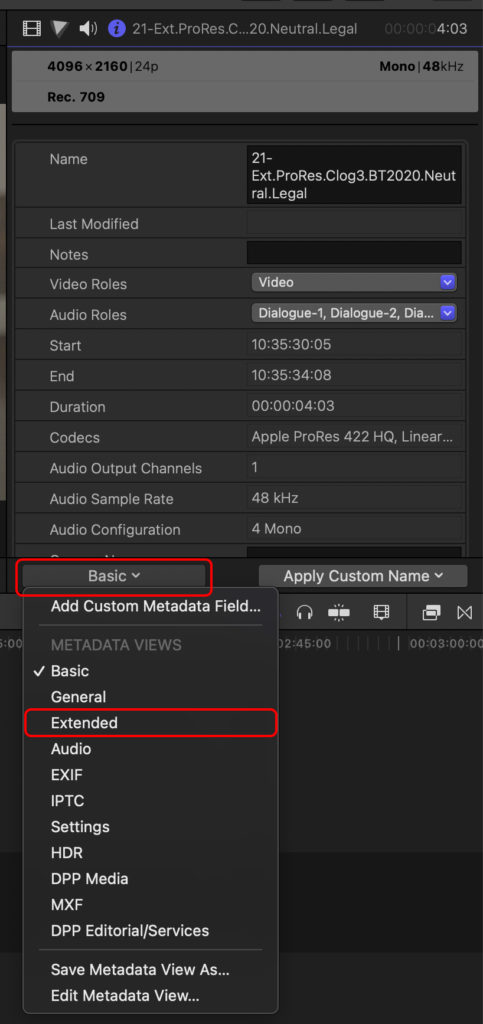
- Select your footage and go to the “Info” panel.
- Select the “Extended” view on the Info panel.
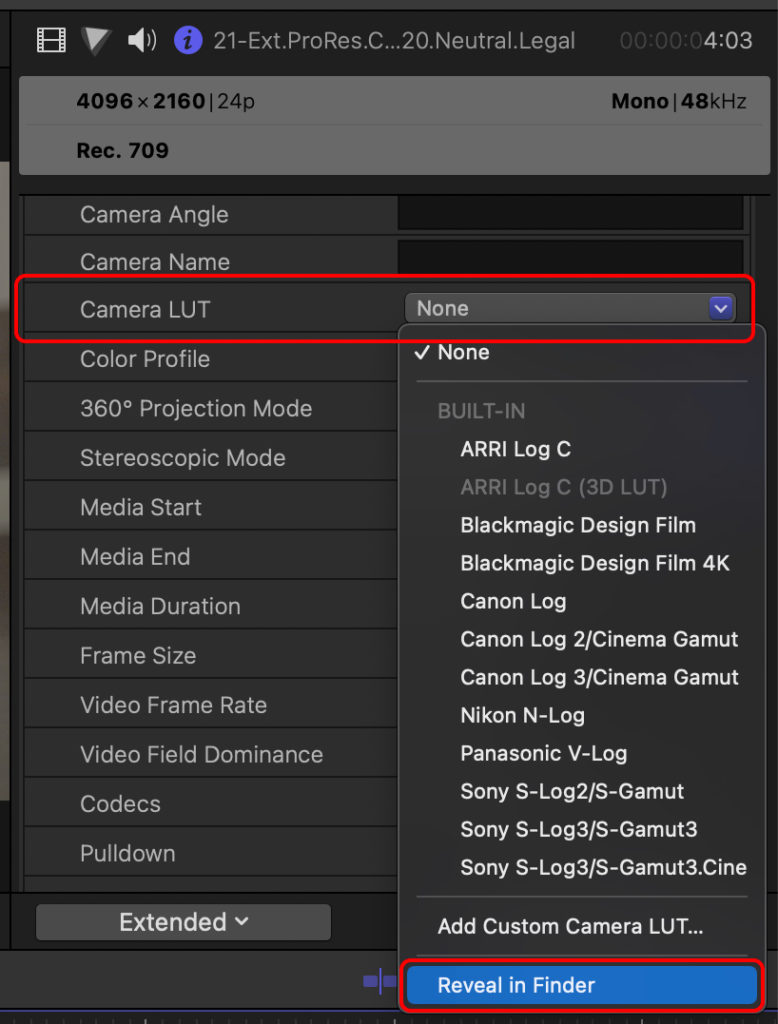
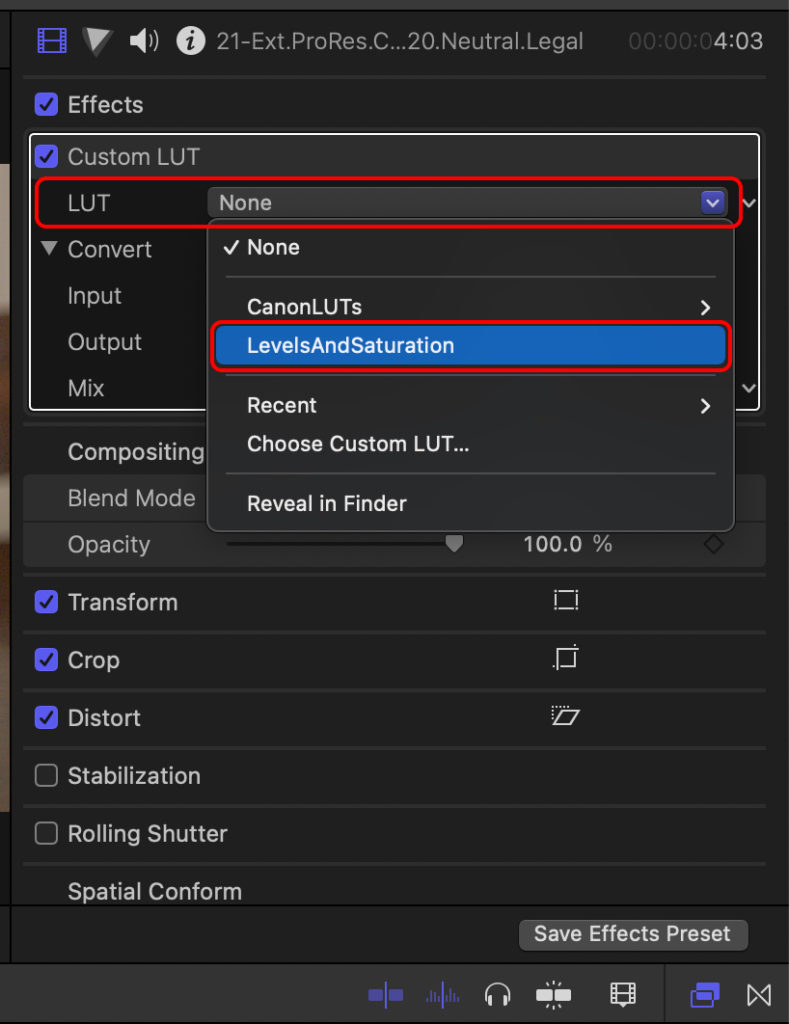
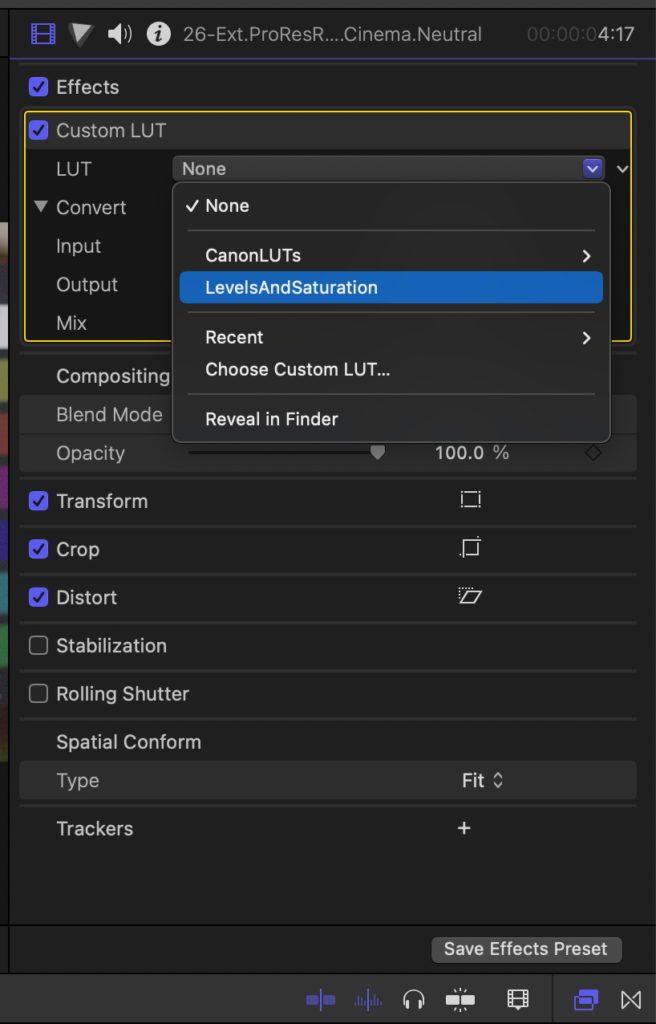
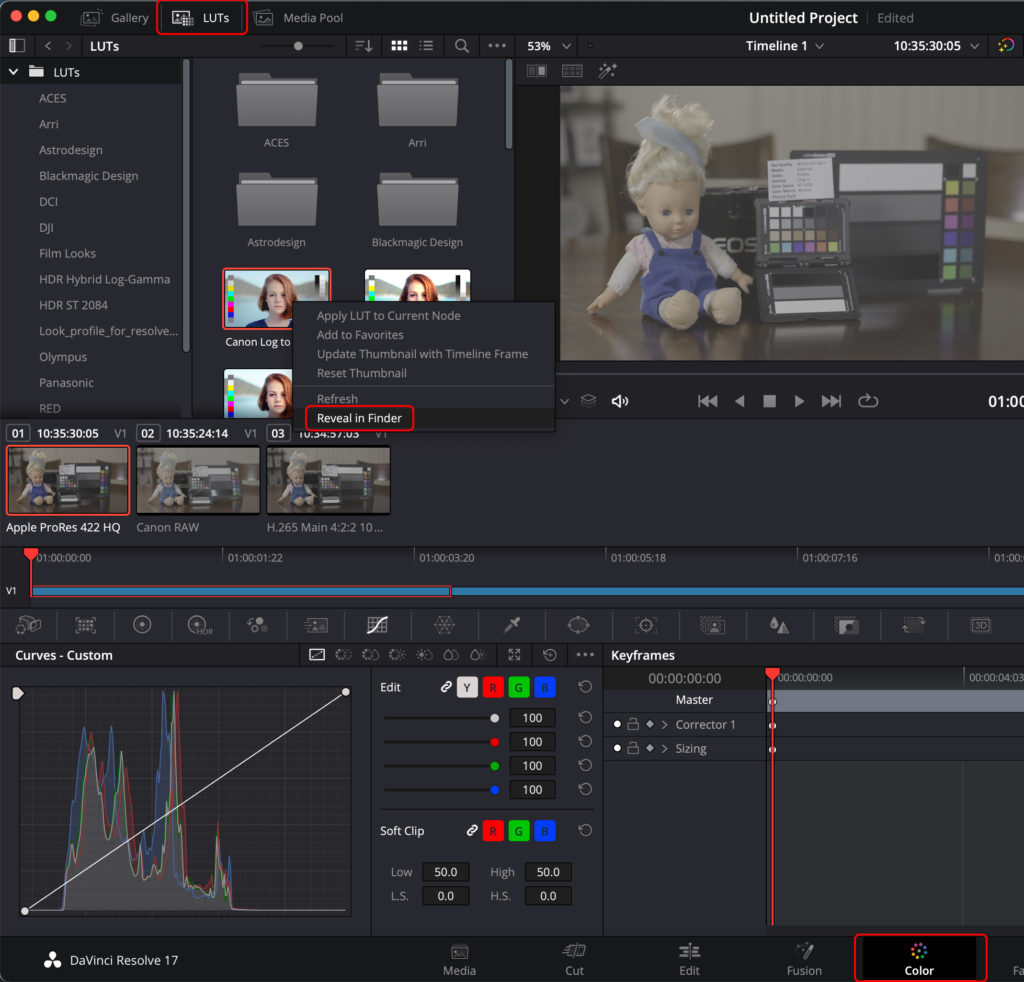
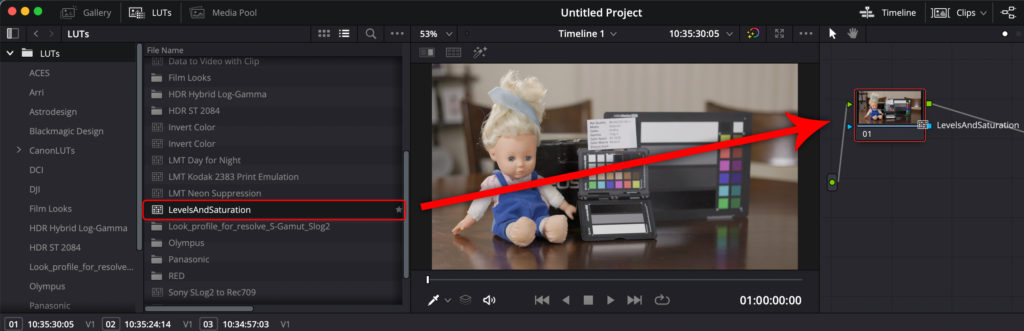
- On the Info panel, click on the drop-down option called “Camera LUT”, and select the
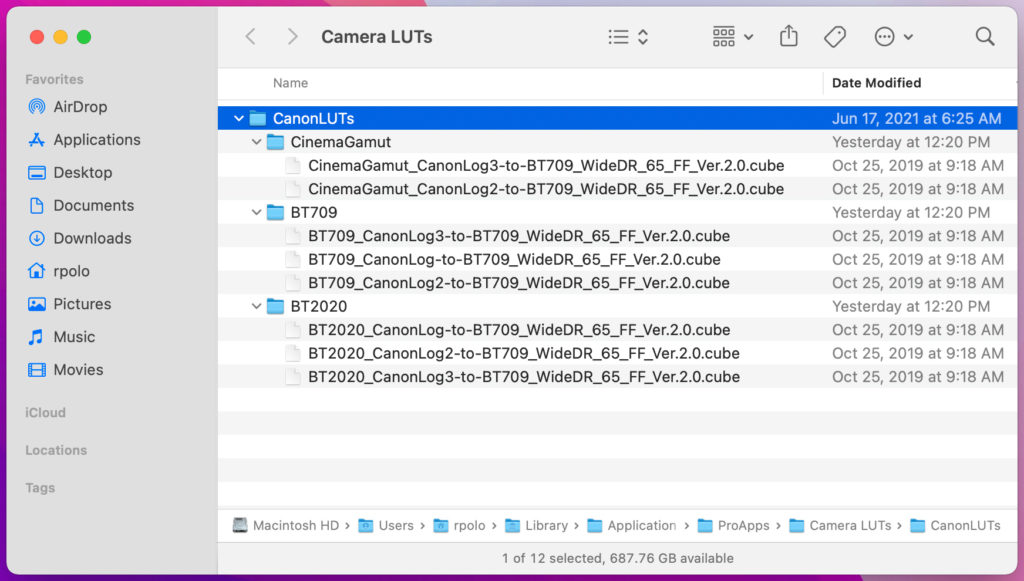
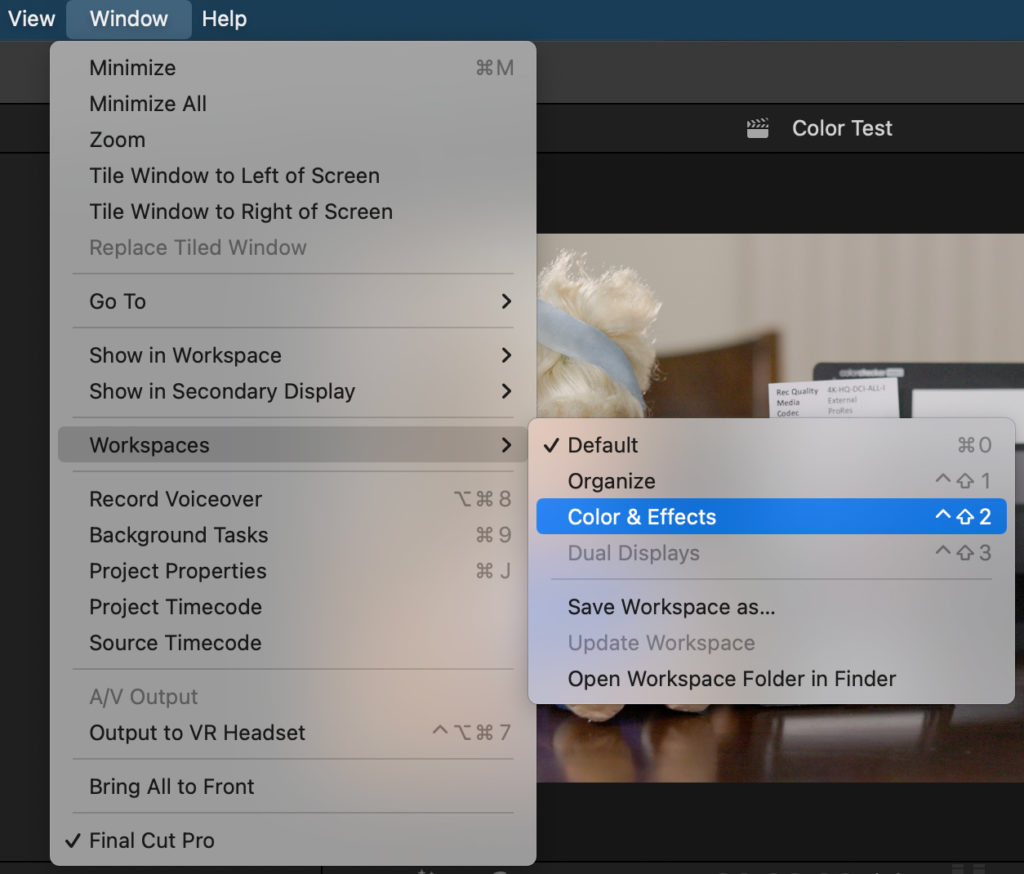
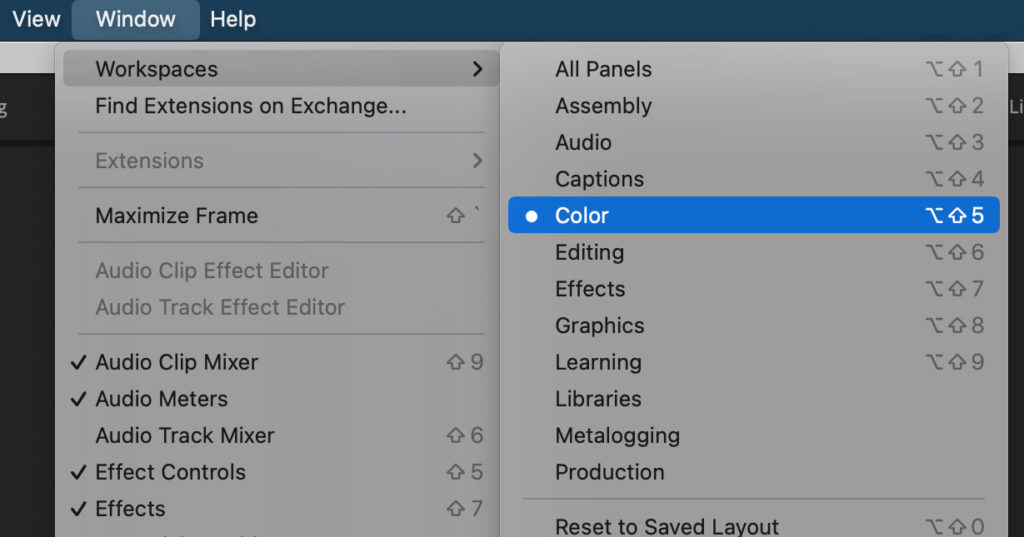
BT2020_CanonLog3-to-BT709_WideDR_65_FF_Ver.2.0.cubeLUT, if isn’t there already, add the Canon LUTs there by clicking on “Revel in Finder”, and copy the canon LUT files in the Folder, FCP automatically refresh and display LUTs in the folder.- Switch to “Color & Effects” workspace by clicking on “Window” menu, “Workspaces”, “Color & Effects”.
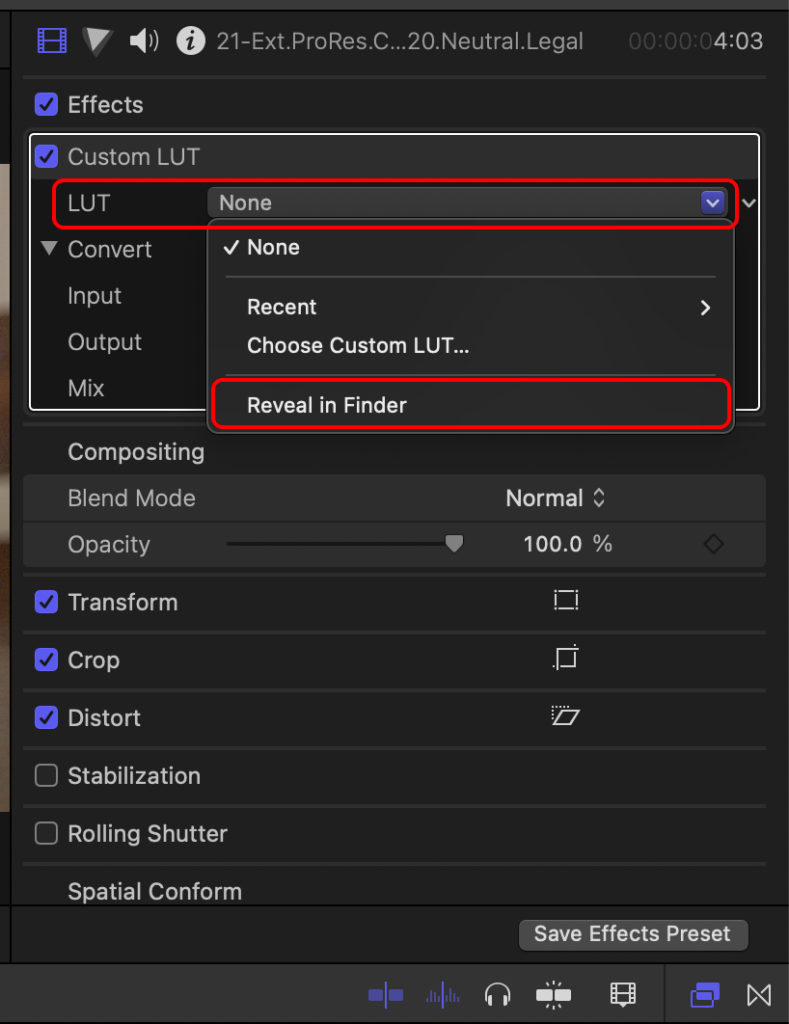
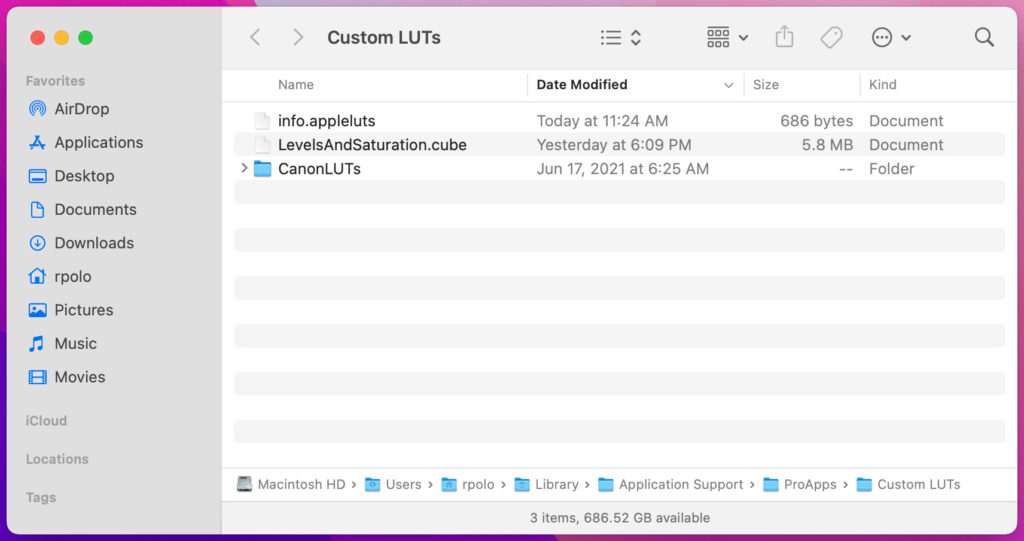
- Adjust your footage as you want or add a custom Rec.709 LUT, I provide mine called
LevelsAndSaturation.cube, to apply a custom Rec.709 LUT, find the “Custom LUT” effect, drag and drop it on the footage in the timeline, select the “Video Inspector”, and browse or add your custom Rec.709 LUT.

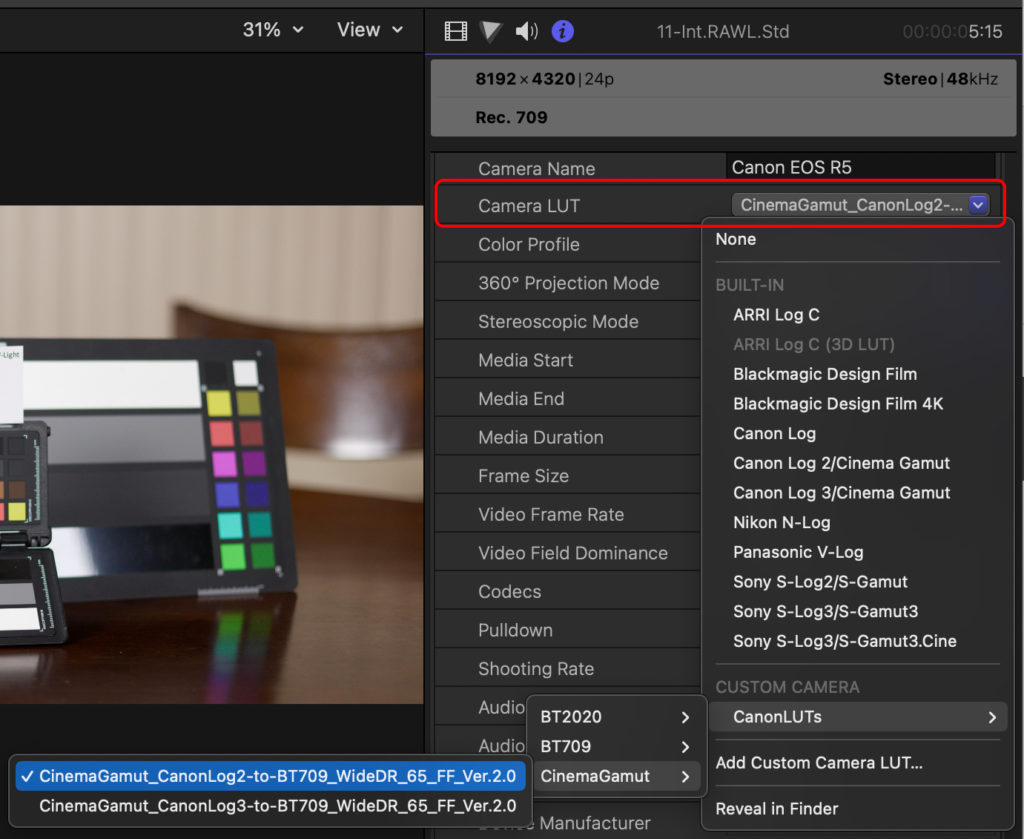
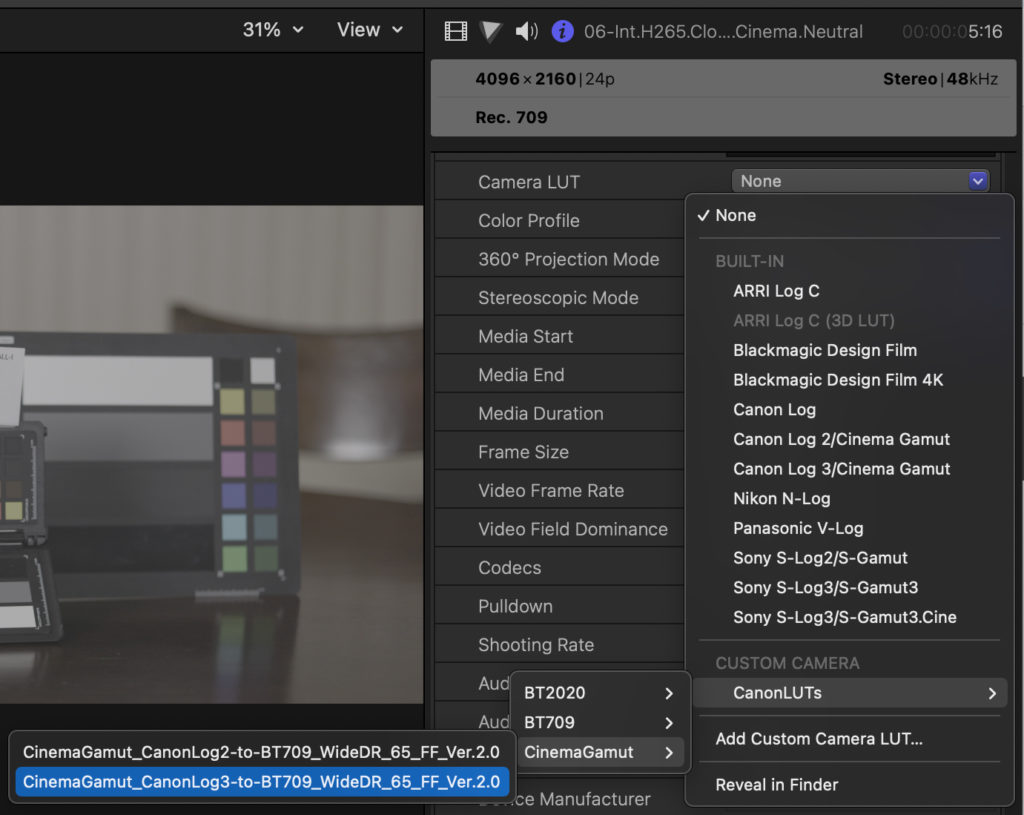
Internal Canon RAW recording
Having installed the Canon RAW Plugin 2.4 for Final Cut Pro, steps are just like the previous example, using the same project:
- Drag your footage to your timeline.
- Select your footage and go to the “Info” panel.
- Select the “Extended” view on the Info panel.
- On the Info panel, click on the drop-down option called “Camera LUT”, and select the
CinemaGamut_CanonLog2-to-BT709_WideDR_65_FF_Ver.2.0.cubeLUT. - Switch to “Color & Effects” workspace.
- Adjust your footage as you want or add a custom Rec.709 LUT.
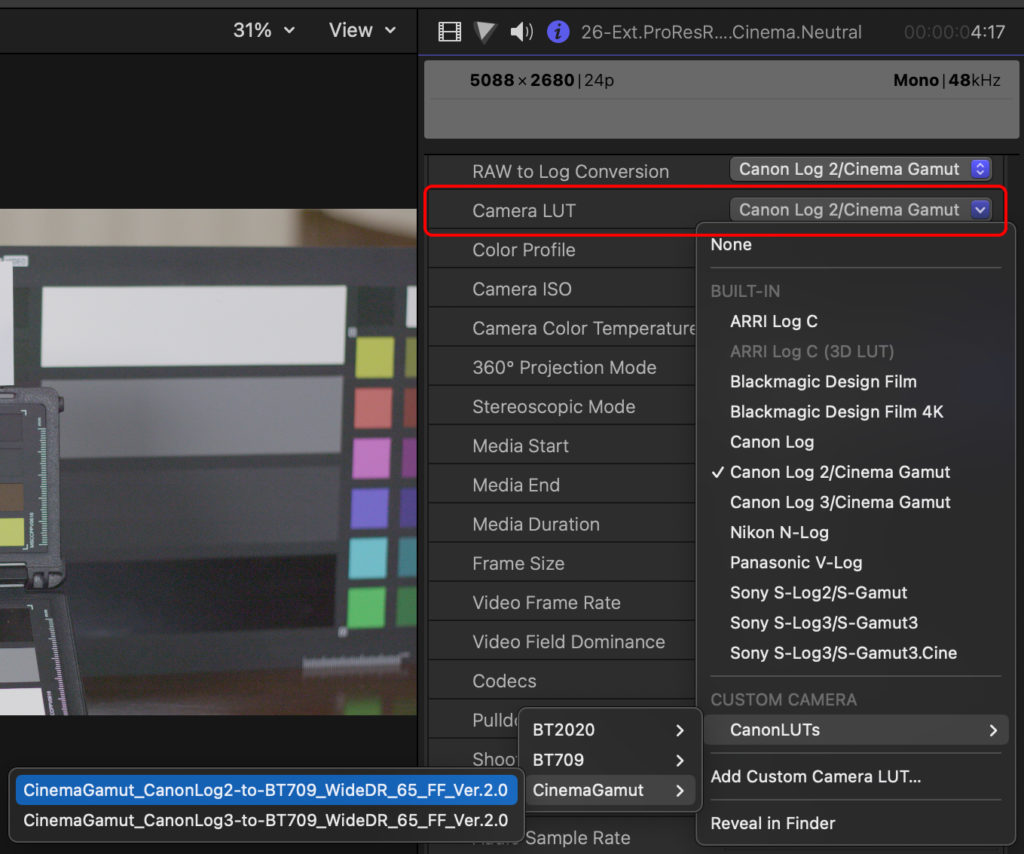
ProRes RAW external recordings
Exactly as the two previous examples but with a different LUT:
- Drag your footage to your timeline.
- Select your footage and go to the “Info” panel.
- Select the “Extended” view on the Info panel.
- On the Info panel, click on the drop-down option called “Camera LUT”, and select the
CinemaGamut_CanonLog2-to-BT709_WideDR_65_FF_Ver.2.0.cubeLUT. - Switch to “Color & Effects” workspace.
- Adjust your footage as you want or add a custom Rec.709 LUT.
Internal HEVC/H.265 C-Log 3 / Cinema Gamut recordings
Just like the four previous examples but with different LUT:
- Drag your footage to your timeline.
- Select your footage and go to the “Info” panel.
- Select the “Extended” view on the Info panel.
- On the Info panel, click on the drop-down option called “Camera LUT”, and select the
CinemaGamut_CanonLog3-to-BT709_WideDR_65_FF_Ver.2.0.cubeLUT. - Switch to “Color & Effects” workspace.
- Adjust your footage as you want or add a custom Rec.709 LUT.
Dealing with the ESO R5 footage in Adobe Premiere Pro
Adobe Premiere Pro steps are similar to Final Cut Pro, but I’ll NOT add the LUTs to Premiere because in combination with Media Encoder, both have issues sharing the LUTs.
Ninja V External recording using C-Log 3 in Rec.2020 with the “Legalize” toggle on
- Create a new project and switch to the “Color” workspace.
- Drag your footage to your project library.
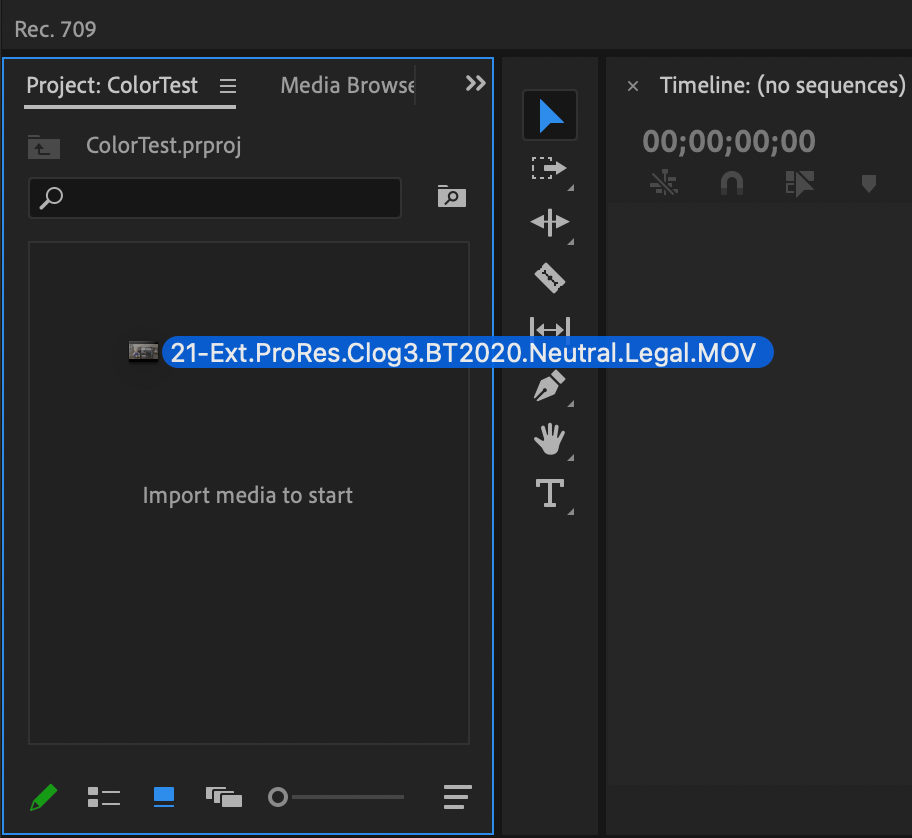
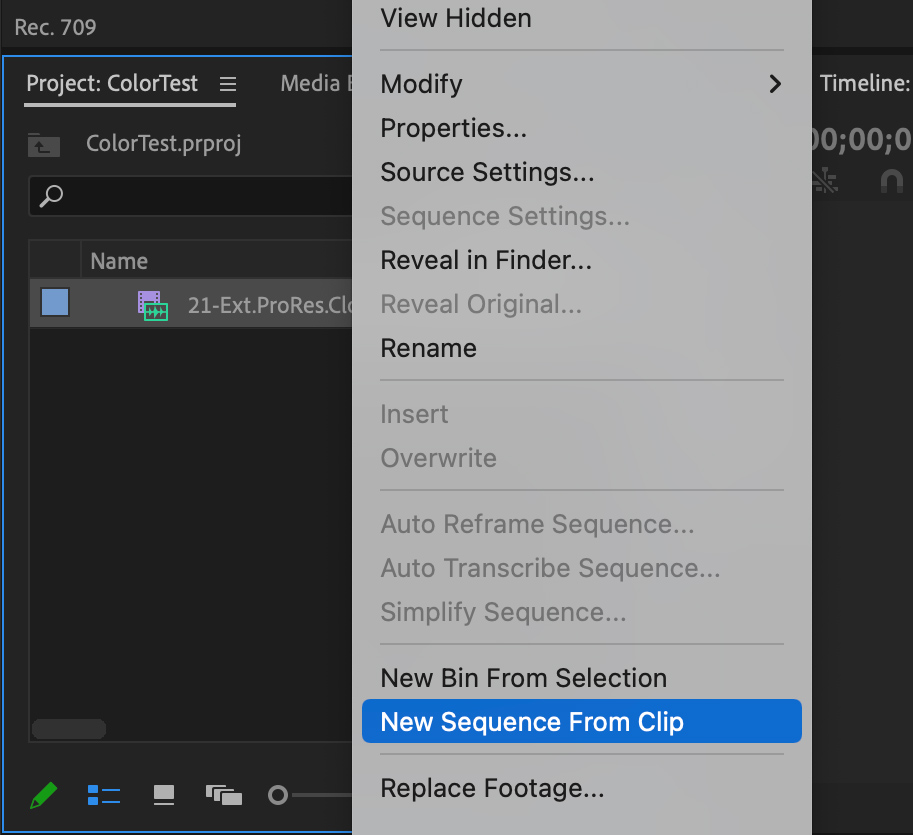
- Create a new sequence from the clip imported.
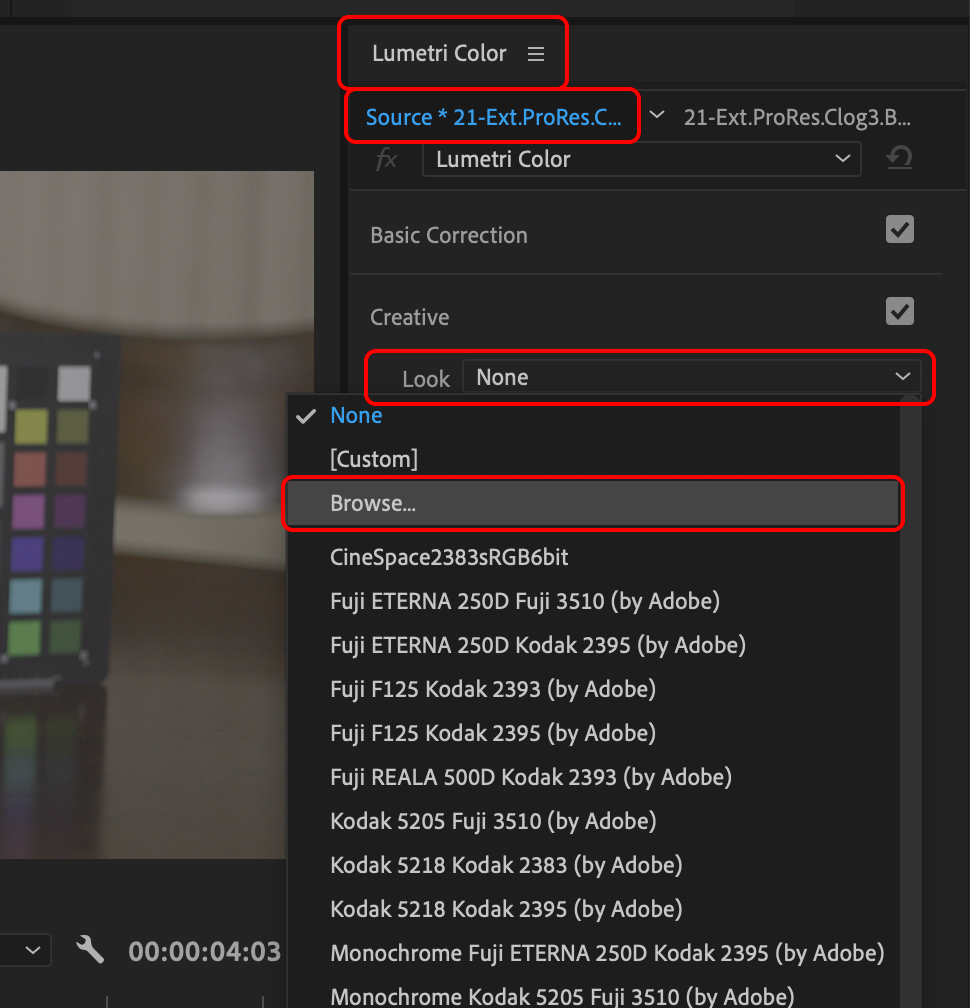
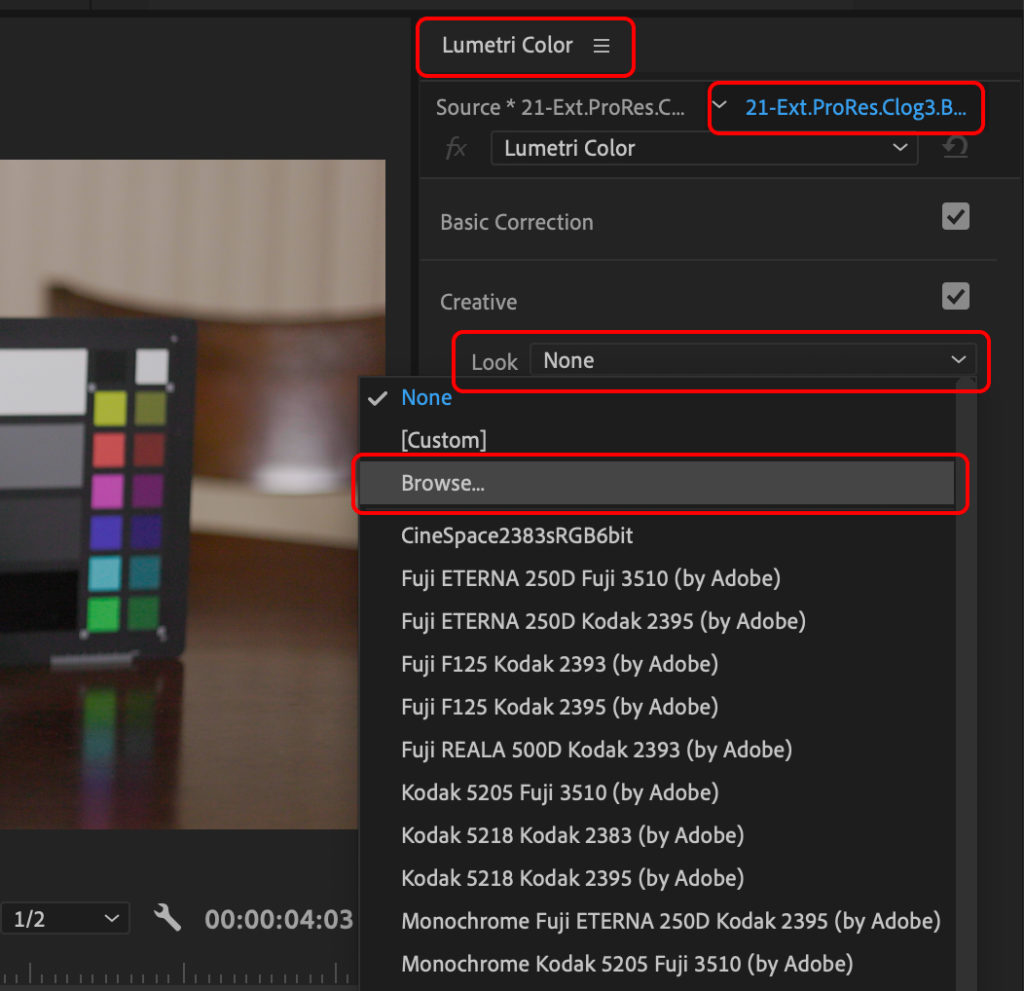
- Select the footage, and clic on the “Lumetri Color” panel, then select the “Source” tab.
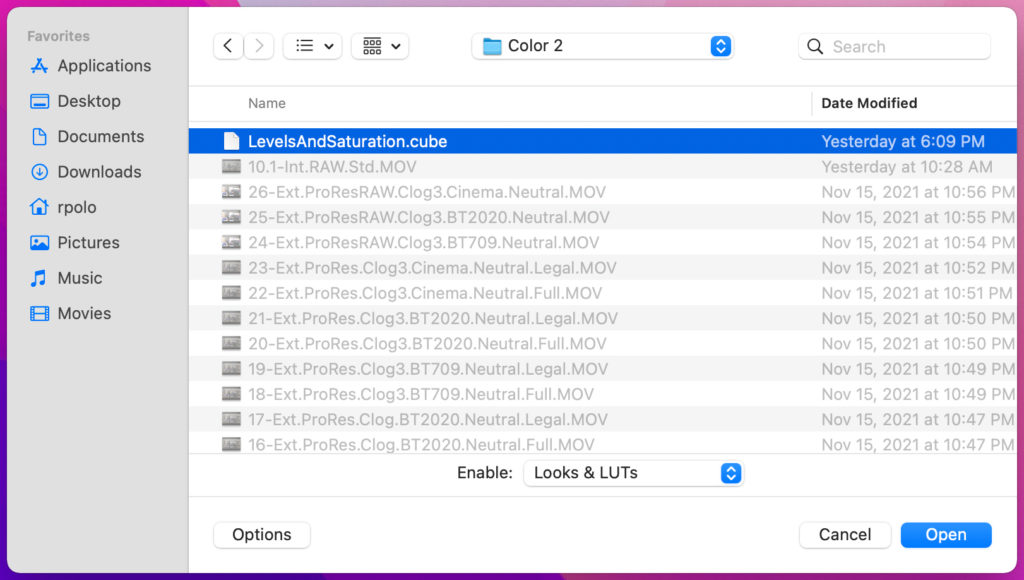
- On the “Lumetri Color” panel, “Source” tab, click in the drop down menu in “Look” or “Input LUT” (depending on the Premiere version), and select “Browse”.
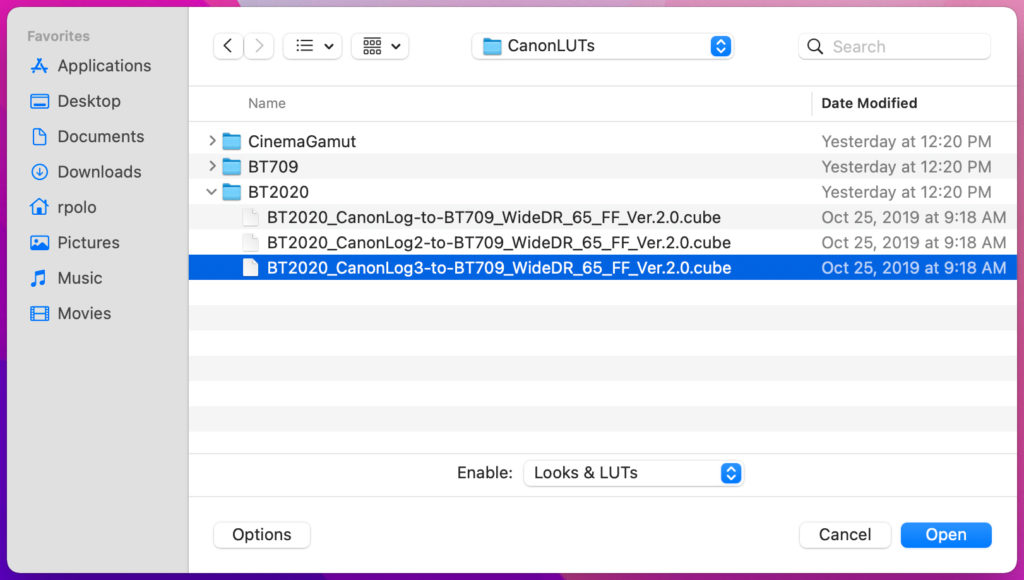
- Browse and select the
BT2020_CanonLog3-to-BT709_WideDR_65_FF_Ver.2.0.cubeLUT. - Grade your footage as you want on the “Lumetri Color” panel, on the “Comp” tab, or load a custom Rec.709 LUT in the same tab, by clicking on the drop down menu in “Look” or “Input LUT” (depending on the Premiere version), and select “Browse”, then browse and select the LUT.
Internal Canon RAW recording
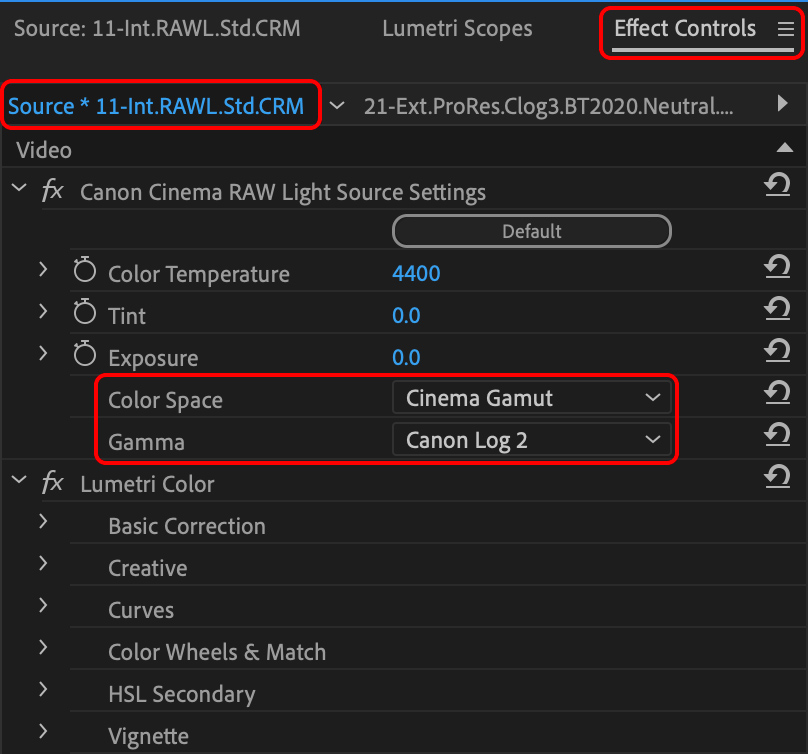
Just like in the previous example, but using the CinemaGamut_CanonLog2-to-BT709_WideDR_65_FF_Ver.2.0.cube LUT, but make sure the Color Space of the clip is set to Cinema Gamut and the Gamma is set to Canon Log 2 on the “Effect Controls” panel, “Source” tab:
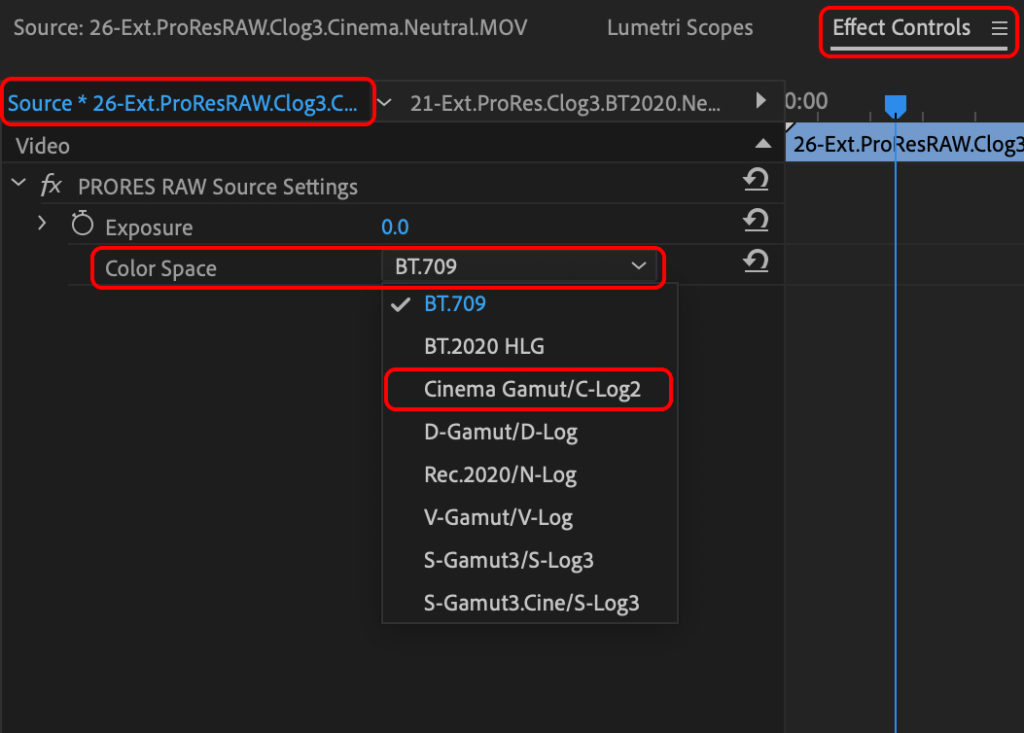
ProRes RAW external recordings
Just like in the previous example, using the CinemaGamut_CanonLog2-to-BT709_WideDR_65_FF_Ver.2.0.cube LUT, and making sure the Color Space of the ProRes RAW clip is set to Cinema Gamut / Canon Log 2 on the “Effect Controls” panel, “Source” tab:
Internal HEVC/H.265 C-Log 3 / Cinema Gamut recordings
Just like in the first Adobe Premiere Pro Example, but selecting the CinemaGamut_CanonLog3-to-BT709_WideDR_65_FF_Ver.2.0.cube LUT.

Dealing with the ESO R5 footage in DaVinci Resolve
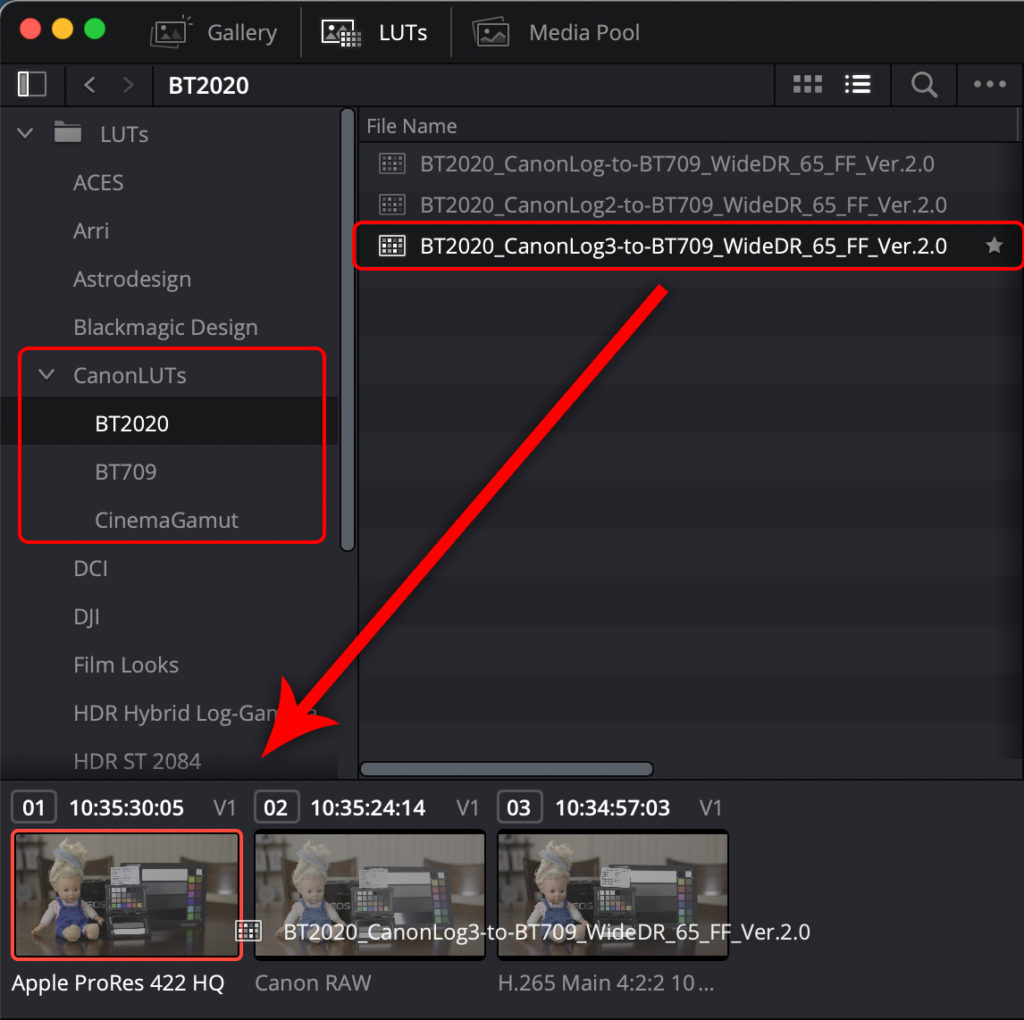
Blackmagic Design DaVinci Resolve 17 is without a doubt, the best NLE for color correction and grading, but sadly, it doesn’t support Apple ProRes RAW, nevertheless, it is where I created the LevelsAndSaturation.cube LUT, so first, let’s load Canon provided LUTs and the custom LUT into Resolve’s LUT library.
Setting-up LUTs and the project
- Create a new project.
- Go to the “Color” space by clicking the “Color” icon at the bottom of the window.
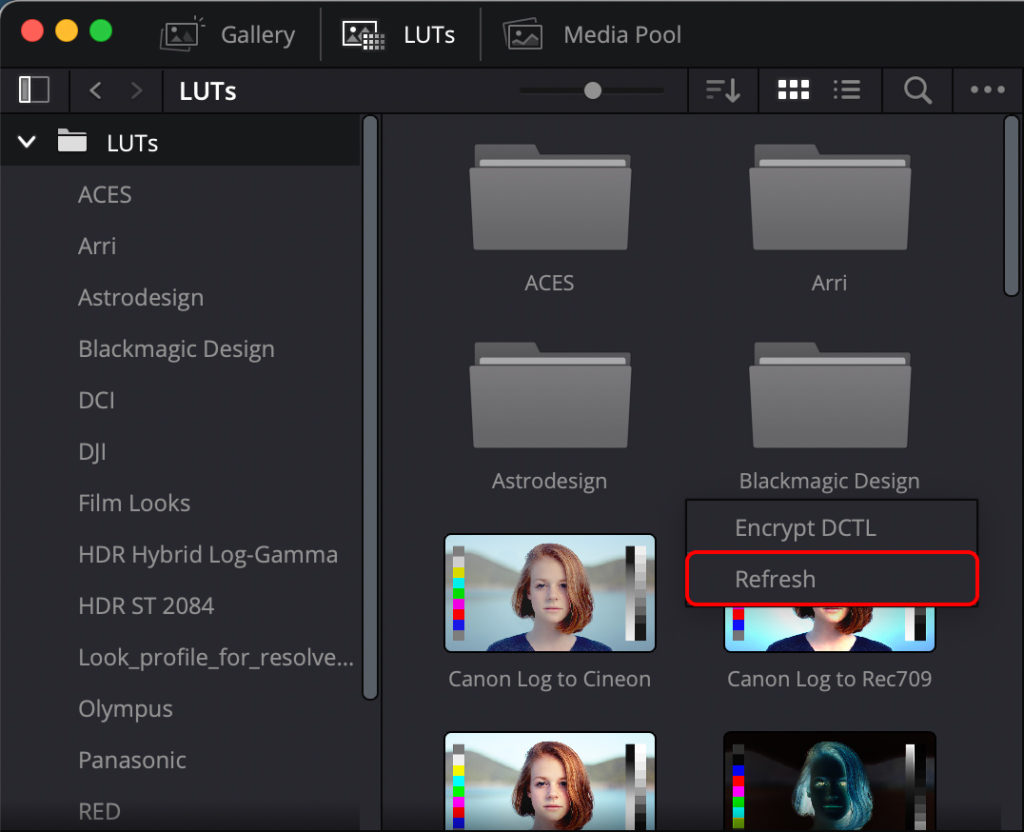
- Click on the “LUTs” switch.
- Righ-click any LUT to open the contextual menu, and then clic on “Reveal in Finder”, this will open the location of the LUTs folder in Finder.
- Copy the Canon provided LUTs and your custom LUTs into the folder.
- Righ-click on the LUTs window background to open the contextual menu, and then click on “Refresh”, your LUTs will appear immediately.
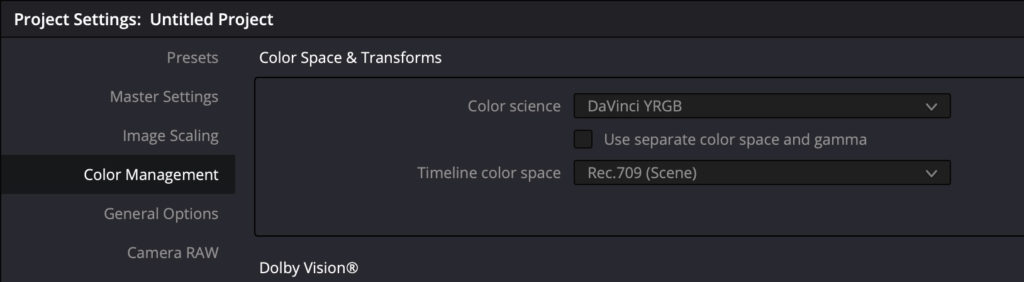
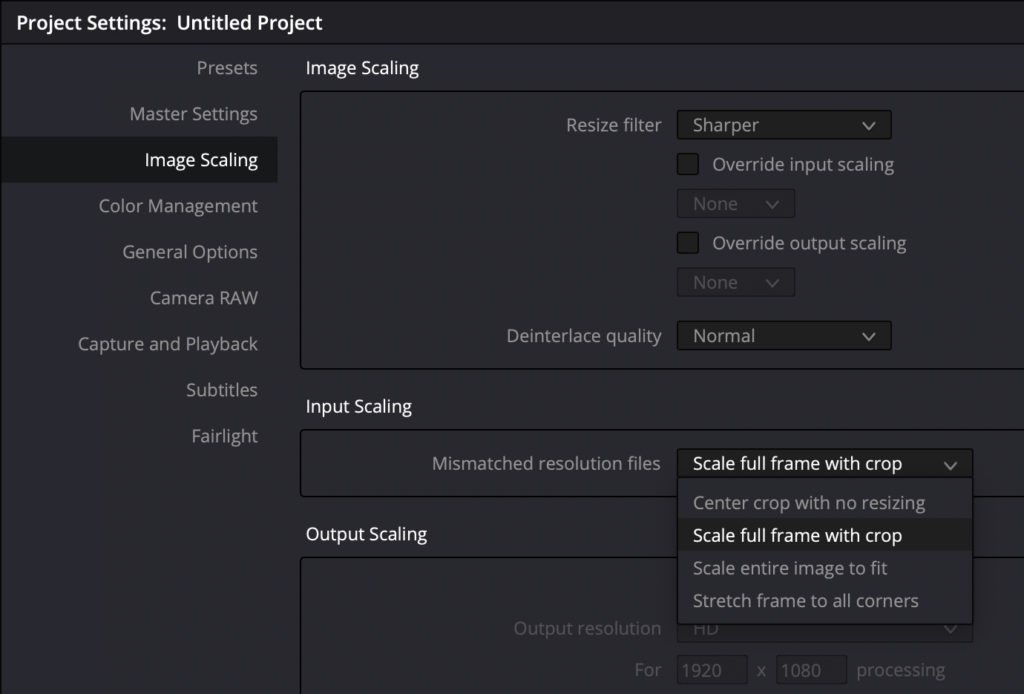
Now let’s setup our project resolution, color space and resizing options:
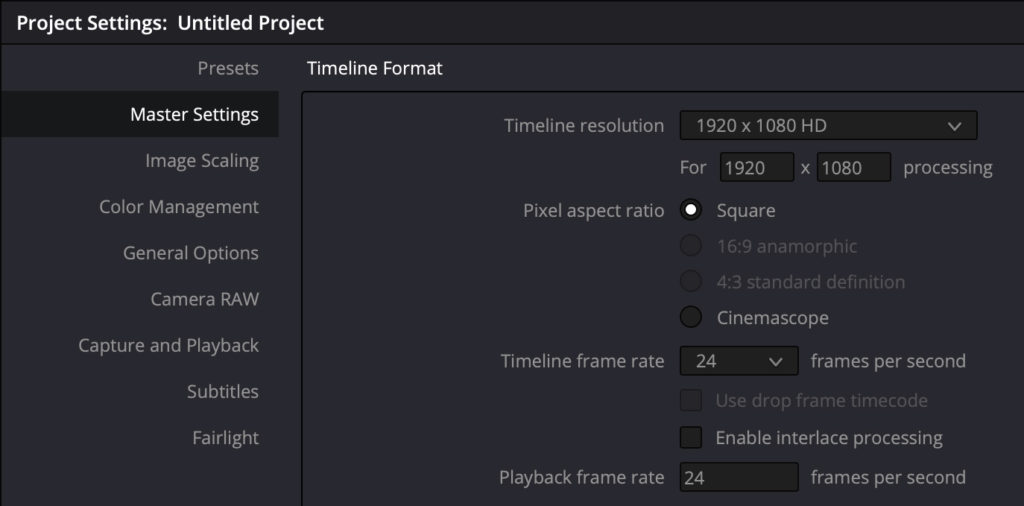
- Click on the gear located in the left-bottom corner of the screen.
- In the Project Settings window, in the “Master Settings” tab, set the resolution to 1920×1080, it is the recommended resolution to have a fast playback experience, you can change the resolution before exporting.
- In the “Color Management” tab, select “DaVinci YRGB” for Color science and “Rec.709 (Scene)” for Timeline color space.
- In the “Image Scaling” tab, “Input Scaling” area, select “Scale full frame with crop” to avoid the letterboxing produced by DCI footage.
Ninja V External recording using C-Log 3 in Rec.2020 with the “Legalize” toggle on
- On the “Edit” workspace, drag your footage to the timeline.
- Switch to the “Color” workspace, enable the “LUTs” panel, then, drag-and-drop the
BT2020_CanonLog3-to-BT709_WideDR_65_FF_Ver.2.0.cubeLUT into the clip below the LUTs pannel; alternatively, you can right the clip and in the contextual menu, navigate to the LUT. - Then, select a node and color grade your footage, or add a custom Rec.709 LUT by dragging and dropping the LUT to the node
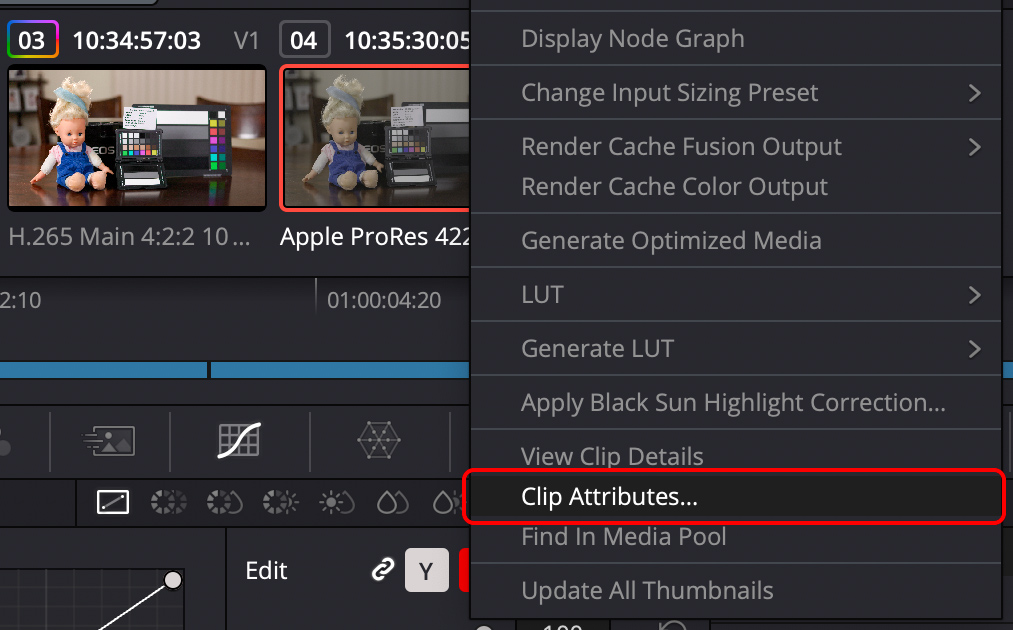
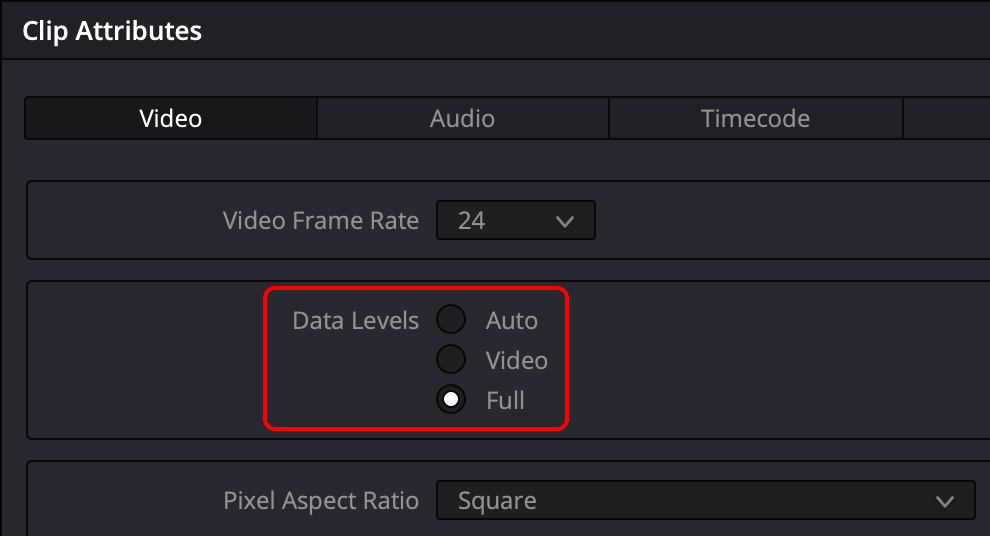
Ninja V External recording using C-Log 3 in Rec.2020 WITHOUT the “Legalize” toggle on
Exactly as the previous example, but set the clip data levels to full by right-clicking on the clip, selecting the “Clip Attributes…” option in the contextual menu, and then, in the “Clip Attributes” window, switching to “Full”.
Internal Canon RAW recording
Resolve automatically asumes the Canon RAW footage uses C-Log 2 with Cinema Gamut, so the steps are almost the same as the previous example, but applying the CinemaGamut_CanonLog2-to-BT709_WideDR_65_FF_Ver.2.0.cube LUT.
Internal HEVC/H.265 C-Log 3 / Cinema Gamut recordings
The steps are almost the same as the first example, but applying the CinemaGamut_CanonLog3-to-BT709_WideDR_65_FF_Ver.2.0.cube LUT.
Some conclusions after the thorough analysis
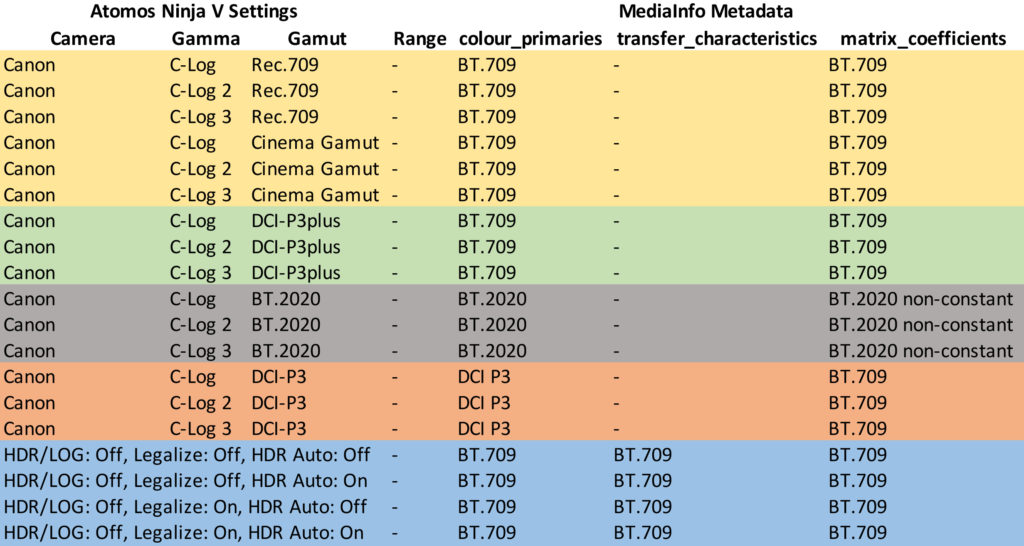
- HDR/LOG toggles modify the metadata of the recorded file, with the HDR/LOG enabled, with Canon as selected camera, and in all cases regardless of the Log version, choosing DCI-P3plus, Rec.709 or Cinema Gamut will tag the footage metadata as “BT.709” for color primaries and “BT.709” for matrix coefficients. Choosing BT.2020 will tag the footage metadata as “BT.2020” for color primaries and “BT.2020 non-constant” for matrix coefficients. Choosing DCI-P3 will tag the footage metadata as “DCI P3” for color primaries and “BT.709” for matrix coefficients. Again, regardless of the C-Log version, and in all cases, without including the video range and the “transfer characteristics” metadata, which it is included if the HDR/LOG toggle is off as “BT.709” with “BT.709” for color primaries and “BT.709” for matrix coefficients.
- All EOS R5 internal recordings are saved in full range, the metadata inside each movie file contains this flag and is interpreted as full range in each NLE accordingly.
- HDMI output of the EOS R5 is always in full range, regardless of the settings.
- The Atomos Ninja V monitor displays the signal in normal/video range and in Rec.709 color space, regardless of the signal range or color space. This is quite important, specially while applying LUTs.
- Considering that the EOS R5 HDMI signal is in full range, if you want to see how the image will look to use false color for exposure and/or want to use RGB Parade for white balance, you’ll need to set the Ninja V “HDR/LOG” toggle to “Off” and the “Legalize” option to “On”. And if your footage is in LOG, you’ll need to load the Canon LOG-to-Rec.709 LUT into the Ninja V accordingly, extra to the “Legalize” option enabled, but beware, this will change the video levels recorded, so it is recommended to turn off the “Legalize” toggle after setting the exposure and while balance, only if you use Resolve, I’ll go into more detail later.
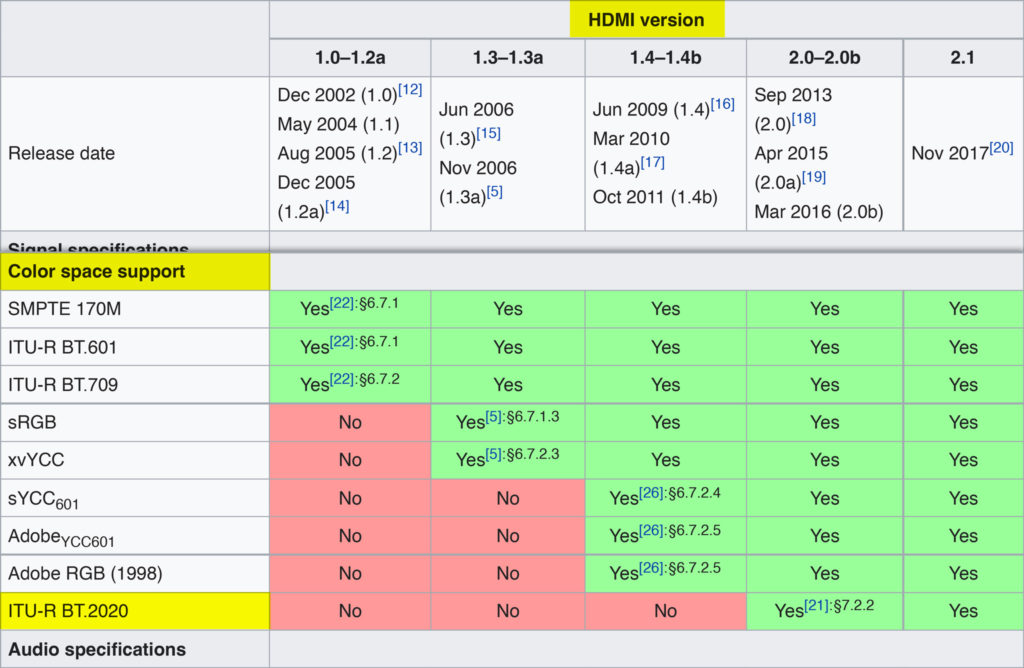
- Canon Cinema Gamut color space can only be used internally, the EOS R5 doesn’t output Cinema Gamut trough HDMI, and if it selected in the camera, it will record Cinema Gamut internally, but output Rec/BT.2020 trough HDMI, it appears to be a Canon made limitation (the infamous Canon cripple hammer). More info about this matter here: https://rodrigopolo.com/2024/04/29/no-cinema-gamut-trough-hdmi/ And here: https://rodrigopolo.com/2024/05/26/bt-2020-instead-of-cinema-gamut-a-fix-for-the-eos-r5/
- If you don’t use Resolve but use Adobe Premiere Pro or Final Cut Pro, keep the “Legalize” toggle always on, if you use the best NLE out there, Blackmagic Design DaVinci Resolve, you can turn “Legalize” off after exposing and doing the white balance, Resolve allows to change the video/data levels, so you can set the recorded footage to full range.
- Only Blackmagic Design DaVinci Resolve has the availability to change the footage video levels, and if you didn’t enable the “Legalize” option in LOG recordings as it is recommended in the Atomos Ninja V user manual from Octobre 2021, in page 27, stating “For Log inputs, the conversion to LEGAL range should NOT be applied”; you can set the video/data levels to “Full” in order to make it work as it is an internal recording.
- When recording RAW footage in ProRes RAW, the Atomos Ninja V behaves as all of us want and expect, monitoring with a LUT so we know how the result will be, and recording the signal as-is without LUTs and/or video level modifications. This is the expected behavior any enthusiasts wants while recording LOG, monitoring how the footage will look in the NLE but storing the full range and LOG format of the signal.
- On the EOS R5, enabling C-Log while recording RAW internally, produces more noise, without C-Log enabled, RAW footage look considerably less noisy, and in any NLE, it retains its ability to be interpreted as C-Log 2 / Cinema Gamut.
- Cinema RAW Light is little bit more noisy.
- After applying the LOG-to-Rec.709 to a LOG footage, the difference between the resulting image from a Rec.709 recording has a 20% less gain/luma.
- Enabling “Crop mode” on DCI resolutions, produces a 1.6x HFOV crop factor and 1.7x diagonal crop factor, it uses a 22.5×11.85mm sensor area and uses 5120×2696 pixels.
- The “Crop mode” utilizes an image sensor area of 5120x2696px, and on internal recording, it downsamples the 5K image to 4K-DCI, 80% of the original pixel dimensions; on external RAW it keeps the original resolution.
- External RAW recordings do not care which color space is selected in the EOS R5, and in the case of enabling cropping, an HDMI 1.4 cable works just fine, more about it here.
Misconceptions in Gerald Undone and Atomos videos
So, the official Atomos video, totally misleading, and Gerald’s second video have some issues, in minute 3:33 he states that the monitoring options of HLG and PQ are ways to process the image already in the Ninja V, that isn’t true, it is mean for monitoring and if enable, for output trough HDMI, NOT for recording.
In his previous video, at 0:57, he states that the Ninja treats everything as legal, which isn’t exactly true, the Ninja displays everything as legal but records the signal as it is received, unless the “Legalize” toggle is enabled.
In minute 1:07 he states that the NLE software scales the video to fit the full level, this isn’t exactly true, Premiere works with a timeline that uses video/legal levels, it treats footage without video levels metadata as video/legal/limited range, it doesn’t scales the video range at all. It is a video using full levels without the metadata stating that, that get its levels outside of the legal values of the timeline, same happens with Final Cut Pro and Resolve, but the later, has the option to change the video levels. If the video has the metadata indicating it is recorded in full range, then the NLE scales down the full range to fit the video levels of the timeline.
On minute 1:29 he states that most camera profiles use legal range, and that LOG recordings use full range, this isn’t the case for the EOS R and R5, where the HDMI always output full range video, regardless of the “camera profile” or “LOG” setting.
On minute 1:47 he states that when LOG is recorded internally, the camera either writes the metadata to treat the footage as full range, or the NLE just knows to treat the footage as full because of the way the software was programed, this is totally misleading; in the case of the EOS R5 (verified using Mediainfo), the camera writes the metadata stating that the file uses full range, regardless if LOG is enabled, and it is because of this metadata that the NLE knows it has to squeeze the full range video in a limited level timeline, or leave it as-is in a full range timeline, it is the Atomos Ninja V that produces footage that lacks the right file metadata about the video levels that makes the software asume the file use video levels.
On minute 1:28 he states that most camera profiles are based on legal range, and in minute 3:31 he states that LUTs (and transforms like ACES) will not be mapped 100% correctly because they were built on full range, in both cases he is partially wrong, Canon provided LUTs are designed for video levels, because most NLEs have a timeline in video level, until recently Final Cut enable HDR mode, but Adobe Premiere mostly works in video levels, also, the Ninja V expects any LUT it loads to be designed for video levels, so NO, most LUTs are designed for video levels, Canon provided LUTs are designed for video levels; ACES is another story.
How Atomos could fix the Ninja V(+)
Maybe most professionals already knew what to expect from Atomos Ninja V, but most enthusiast were mislead into believing that the monitor displayed the signal as it was displayed in the EOS R and R5 screen, and to correctly preview LOG footage, just like the EOS R and R5 have the “View Assist” option, we loaded a LUT into the monitor, but before Gerald Undone video, there wasn’t any information about video levels. Yes, the Atomos team added a workaround with the “Legalize” toggle, but…
…What if you want to preview your image in legal range with a LOG-to-Rec.709 LUT applied and record the signal in full range as it is recommended in the Atomos User Manual from October 2021?
I think there should be a toggle for “Legalize” only in monitor, and one toggle to “Legalize” the recorded signal, two separate toggles, and I don’t know if a firmware upgrade could do that, I hope it can be done, and that more users appeal for this to Atomos, but for that, they have to know about the issue.
HDR Toggles and its effect in file metadata
HDMI and color spaces, no Canon Cinema Gamut
Sample files settings and download links
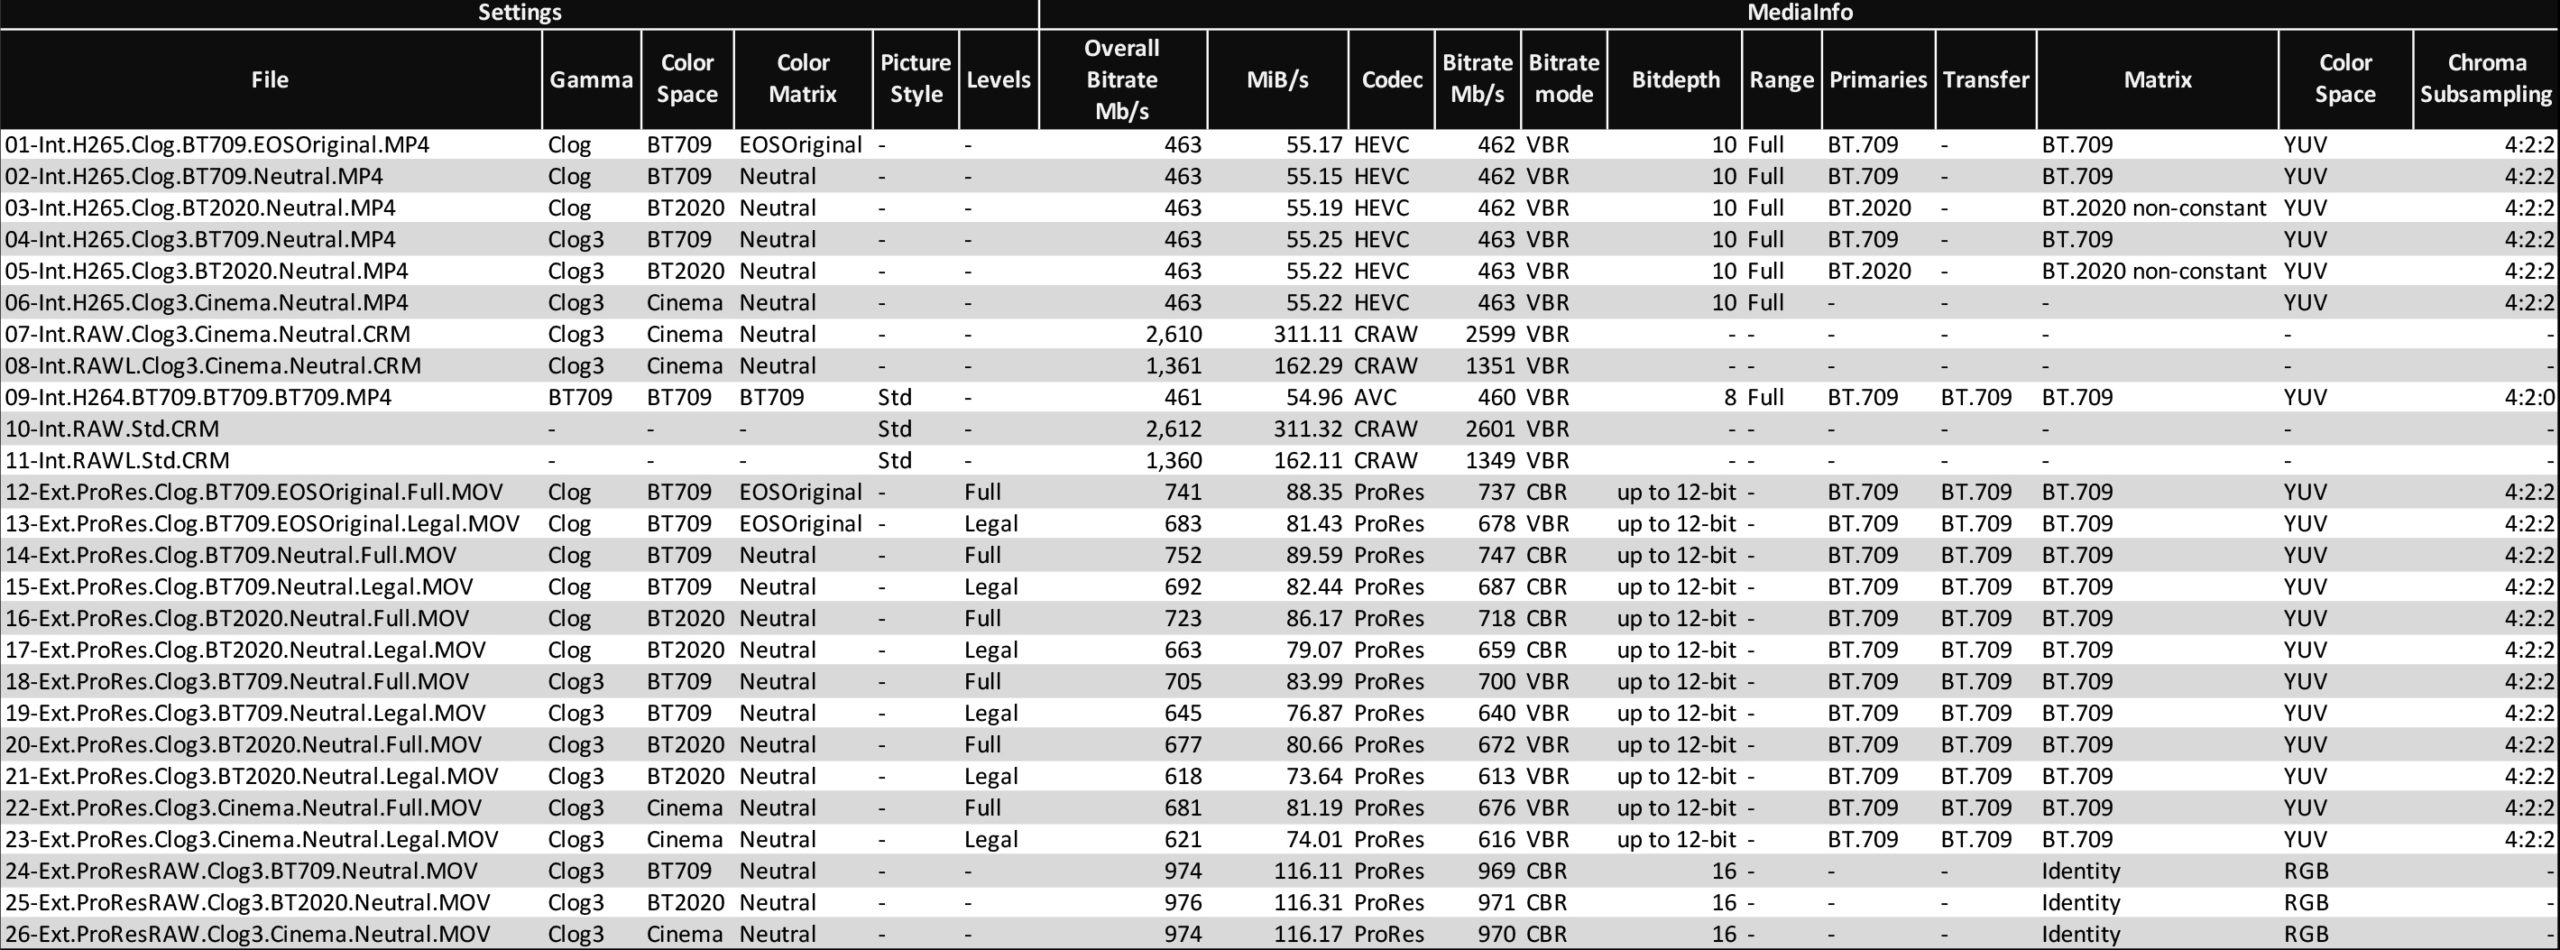
For anyone to try this guide, all the recorded footage is available for download here, it was recored using the EOS R5 with the Canon EF 50mm f/1.8 STM using the EF-to-RF Canon Adapter, connected to an Atomos Ninja V using an HDMI 1.4 cable. Camera settings were 50mm, f/1.8, ISO 800, 4400k, also, here are the file specs, :

Hi there ! Still struggling with my settings of my R5..
At the end of your post you mention that the HDMI 1.4 does not support Cinema Gamut, but does it really support BT2020 ?
Also, what the benefit to choose BT2020 color space on the R5 if i work on rec709 timeline ?
I always need to put a conversion lut or CST on davinci to convert 2020 to 709. So are we still have more color informations to work with by select bt2020 on color space setting ?
Thank your for the nice works here !
-At the end of your post you mention that the HDMI 1.4 does not support Cinema Gamut, but does it really support BT2020?
Ok, I made a test with the HDMI 1.4 cable and with an HDMI 2.1 cable, both produce exactly the same results and the Canon Rec.2020 LUT work as expected, this is the HDMI 2.1 cable I used:
https://www.amazon.com/gp/product/B08L6C7BDC/
-what the benefit to choose BT2020 color space on the R5 if i work on rec709 timeline?
As it is shown in the color space graph, Rec/BT.2020 is a color space that is bigger than traditional BT/Rec.709/sRGB, it is ideal for LOG footage because it has more latitude, so you can have more information to work with, similar to RAW photos, 14bit is better than 12bit RAW photos.
-I always need to put a conversion lut or CST on davinci to convert 2020 to 709. So are we still have more color informations to work with by select bt2020 on color space setting?
Yes, you can see how much color Rec.2020 provide, you can use a LUT or do a LOG to Rec.709 conversion by hand, or use a Color Transform in Resolve. The deal with LOG is that light is captured In a logarithmic way instead of linear, it is the sweet spot between RAW video and Rec.709 video, you don’t have huge RAW files but still can grade the footage.
Take a look at this videos on those topics, they explain quite well this topics, highly recommended:
Color and video
https://youtu.be/FTKP0Y9MVus
Add VFX to Cinematic RAW and LOG Footage
https://youtu.be/aJF2sAjRsy0
https://youtu.be/LssHxDCM7H4
Rafael Ludwig, three videos showing how to grade C-Log to Rec.709 using Final Cut Pro, Premiere and DaVinci Resolve, great videos:
https://youtu.be/UYWFOimYFGA
https://youtu.be/8lTUqg9uHRg
https://youtu.be/NkZ2c9xPYoA
Now, What is the issue you are experiencing?
Thanks for your reply.
I try to switch to BT709 cause using BT2020 on a 709 Timeline in Davinci is like a multiply of each tools. Here an exemple : when i balance my shot, if i put +100 to yellow on 2020 shot is like you put +300 on the 709 one. Kind of hard to make a little change in BT2020, always to put number never use mouse. I understand the fact that we have more room color before the CST node but using other nodes before the CST on BT2020 shot is way too strong on a REC709 Timeline but not on DCI or 2020 timeline.
For now i choose this settings : CLOG 1 (3 is too noisy for my rolloff shadow style) with 709 color space.
Still waiting for someone to convince me CLOG3 is way better for one stop and noisy shadow, and convince me about BT2020 cause even if i grade with Waqas Qazi methode, the moves are way too strong (Temp/color separation..etc)
-“I try to switch to BT709 cause using BT2020 on a 709 Timeline in Davinci is like a multiply of each tools.”
If you have the right LUT or Color Space Transform, there should not be any problem, and with Rec.2020 there is more room for corrections.
-“when i balance my shot, if i put +100 to yellow on 2020 shot is like you put +300 on the 709 one. Kind of hard to make a little change in BT2020, always to put number never use mouse.”
Exactly, because there is more room to play with.
-“For now i choose this settings : CLOG 1 (3 is too noisy for my rolloff shadow style)”
It depends how you expose your shoot, that is why I use an external monitor matching the settings with the camera, with the respective LUT and over that, I use false color, here is an excellent tutorial on how to expose the C70:
https://youtu.be/zCl7B-xyRfQ
For C-Log 3 without an external monitor, I expose from ⅓ to 1 stop to the right (extra exposure) and then I pull the shadows back to black if needed.
“-Still waiting for someone to convince me CLOG3 is way better for one stop and noisy shadow”
C-Log has more latitude for color grading and correction in post, there is no question about it, but it depends on how you expose your shoots.
-“and convince me about BT2020 cause even if i grade with Waqas Qazi methode, the moves are way too strong (Temp/color separation..etc)”
If you record internally, the easiest way is to record HEVC/H.265/C-Log3/Cinema Gamut and in DaVinci Resolve, use Wide Gamut timeline with a Rec.709/SDR output, selecting the right color space for the clips, that way you wouldn’t need any LUT or color space transform. If you record externally with the Ninja V, C-Log 3 with Rec.2020, Legalize toggle enable and with the Rec.2020/C-Log 3 to Rec.709 LUT loaded in order to see the exposure with false colors, if you record using the Legalize toggle on, just importing the footage to Resolve, and if you turn the Legalize toggle off, setting the range/levels of the clips to full, and in a Rec.709 timeline, applying the Canon provided Rec.2020/C-Log 3 LUT.
Thank you Master. Im good to go, using your settings will be fine, am just starting to understand right now all these tips, thank to you.
Appreciate you putting this all together, it has been very time consuming constantly troubleshooting the many issues the Ninja V has with the R5, which is not limited to the Cinema Gamut issue. I too feel mislead into investing into the Ninja recording ecosystem. Side question, I and others have reported issues with the R5 and the recorder while shooting 4k 60fps where the footage produces duplicate frames in Premiere thus producing choppy slowmotion. Have you experienced this? I am using the HDMI 2.0 cable from Atomos, and a WD Blue drive approved by Atomos for 4k 60 recording as well, kind of a major bummer.
Hi,
just a silly and dumb question:
What was your shutter speed when you shot in 4K60P?
Following the 180° rule, 1/50s for 24fps, 1/120s for 60fps and 1/250s for 120fps, but I don’t remember which one I used in the samples.
Hi Rodrigo,
thank you very much for your incredible work and the effort you put on these tests.
These are enlightening.
I have a Ninja V which I use it paired with a lovely EOS R (the first one).
Camera set to 10bit, Rec.2020 and I edit in Resolve (started using it 2 weeks ago).
Before I was editing in Premiere Pro but I decided to switch.
I am aware that enabling the Legalize toggle causes to lose some dynamic range, although I am not sure to what extent.
Plus, as far as I understand, to correctly monitor the exposure and WB on the Ninja if I decide to not use the Legalize, I have to turn it on for exposure and WB evaluation and metering and turn it on when starting recording.
If my exposure changes (i.e. outdoor shooting in light changing situations) I should re-enable Legalize and disable it back.
I’m thinking to leave it on, it would be very inconvenient for me filming in this way.
What are your thoughts?
Thank you!
Leave legalize on, the difference is negligible.
Whole thing with external Cinema Gamut issues is frustrating. I checked that Canon R5 sends Rec2020 signal over HDMI when Cinema Gamut or Rec2020 is selected. However, internally it is tagged as Rec709. And ninja is also tagging it as Rec709.
Did you find a solution to this? Thank you
There is NO solution, HDMI standards doesn’t support Cinema Gamut, so you have to set your R5 to Rec/BT.2020 color space with any C-Log flavor, as the chart included in this article shows, is the biggest color space available on HDMI and only with that color space the Ninja tagg it as it is, then, on your NLE, choose the LUT with that color space.
Hi Rodrigo
I have a very simple requirement , For the Canon R6 and currently use it as a B Camera and use the Ninja V as a monitor only. I record internally 29.97 FHD & use CLOG3 and want to load the correct LUT for display/monitor to ensure I have a an accurate rendition of the exposure , etc. Question : what is the best LUT for the Ninja V and where can I find it ?
The simple answer is:
1. Set your Canon R6 to use BT.2020 color space, neutral color matrix, and C-Log 3
2. Load the
BT2020_CanonLog3-to-BT709_WideDR_65_FF_Ver.2.0.cubeLUT into your Atomos Ninja V and select it to preview your signal.3. Enable the “Legalize” toggle in your Atomos Ninja V.
Notice, some of the Atomos Ninja V monitors do not display color quite right, you can calibrate the monitor with the Calibrite ColorChecker Display Pro https://bhpho.to/3EcxCpc and the Atomos USB LANC Calibration Cable https://bhpho.to/3C5daUB, yes, another $100 only for a cable. You can also use the waveforms, RGB Parade and scope to get an idea of the signal.
Also, here is a tutorial con how to calibrate the Atomos Ninja V
https://youtu.be/QXOBJ7gvskY
And just in case
https://youtu.be/Juf_96o53uw
Thanks very much for your prompt and informative response. Will the colour space change affect the internal recording.The footage will be used for local community television programs …production requirements Current R6 Video settings NTSC , FHD 29.97 FPS. Rec 709
-Q: “Will the color space change affect the internal recording.”
-R: Yes, you’ll have to apply the same LUT on your editor and it would look as good as it gets, personally, I prefer to use Cinema Gamut instead of BT.2020 because DaVinci Resolve already have color transforms for that color space, BUT you can only get Cinema Gamut recorded internally, because the HDMI standard doesn’t support Cinema Gamut color space.
-Q: “production requirements Current R6 Video settings NTSC , FHD 29.97 FPS. Rec 709”.
-R: The idea of using LOG is to have some flexibility adjusting shadows, highlights, color, etc. in post production, while using LOG or RAW, your priority is to capture the most data of your scene and then in post production, adjust that data to any device, in your case, NTSC FHD (1920x1080px) 29.97fps in Rec.709 color spaces and gamut, but having your footage in LOG and/or RAW gives you the flexibility not only of adjusting the look, color, shadows and highlights, but also gives you the possibility of exporting to other video formats like HDR.
This is explained brilliantly in this video, minute 6:12, but the whole video is quite good.
https://youtu.be/aJF2sAjRsy0?t=372
Also, look at this explaination:
https://youtu.be/Yk7sbXsWTfY
This is a fantastic piece of work . Contrary to advice I received from Atmos support before leaving for a shoot in Egypt.
I am shooting EOS R Mk II with NinjaV+ . I use Premiere Pro .
I now have hours of footage set up in the following way
4K 2020 in camera
legalize “off “ in Ninja
canon 2020 to 709 LUT
Recorded Pro Res HQ
Where does this leave me in post as you point out I should have had legalize “on” to edit in Premiere? What problem have I created and is there a work around?
Many Thanks for this great article and any help you can provide.
Sadly, as far as I know, Premiere doesn’t have the possibility to change the footage data/video levels from full range to legal range, only DaVinci Resolve, and there is a free version available and supports 4K.
Hi, I’m a bit confused. I shoot with the Canon R5, and I’ve got a pretty great work space, and I edit with Davinci. So a few questions to get the best out of my shot:
1) If i’m shooting external Pro Res Raw (cropped for 5k) should I leave CLog3 on or off?
You were saying it’s less noisy, but is that for internal raw recordings only?
2) I can’t seem to find the LUT you recommended for previewing in the atomos monitor. Do you have a link to download it?
3) i have windows, so do you have recommendations for transcoding the pro res raw footage to cinema DNG or something else? i’ve only been able to find tools for that for mac.
1) For some reason, having LOG enabled makes the gain/ISO to behave differently, In my own experience, having C-Log off while recording RAW either internally or externally produced less noisy results, but it will always need some noise reduction in post production.
2) Canon lookup table Version 201911: https://hk.canon/en/support/0200603902?model=4147C it contains the file canon-lut-201911.zip, when uncompressed:
canon-lut-201911 ->
3dlut ->
65grid-3dlut ->
full-to-full-range ->
CinemaGamut_CanonLog2-to-BT709_WideDR_65_FF_Ver.2.0.cube
Load that LUT into the Ninja monitor.
3) If you use Windows, use Adobe Premiere, because the ProRes RAW to DNG convert app is macOS only, if you can get a Mac, here is a guide:
https://youtu.be/RnK2bS8qoWA
Okay. I’ve got a friend with a mac, she might be able to help me ingest footage until I get another workflow going.
So just to clarify, these are monitor luts right? They don’t actually affect the picture? Cause I use Color Space Transform in davinci to correct footage.
And Finally, I am a little nervous about shooting without C LOG in raw. It makes sense on the one hand to have raw instead of log (compressed) footage, but am I reading something wrong about this?
https://support.usa.canon.com/kb/index?page=content&id=ART178219
Okay, this is interesting. When using HDMI RAW OUTPUT on the r5, the default setting is canon clog 3 with no way to turn it off.
Also, for the LUT you recommended. It shows cinema gamut, but i’m shooting in BT2020, (because of the problem with the cinema gamut in the atomos). Shouldn’t I be usding the bt2020 canon log 3 to bt 709?
Wow! Thanks for all your work, research and information. Do you [know] if there are any changes to your described workflow when using a V+ instead of the V? Thx
As far as I know, the only difference between both devices, are extra supported resolutions and some new codecs, so the same workflow applies, here is a comparison:
https://www.bhphotovideo.com/c/compare/Atomos_Ninja_V%2B_vs_Atomos_Ninja_V/BHitems/1637656-REG_1401565-REG
this is great, and ive been using the info for awhile, I am curious though, your custom LUT (levelsandsaturations) you saits provided, but I cant seem to find a download, id like to it to see, I notice the red channel is really hot in my R5 footage.
Here it is
https://rodrigopolo.com/wp-content/uploads/2021/11/LevelsAndSaturation.zip
I made it using the X-Rite ColorChecker Video on my scene, so it could not be the perfect fit for you.
Hello I want to make sure Im doing this right, I have a canon r8 but same questions apply to r5. So I should be in Clog3-Neutral-bt2020 in camera. Then in Ninja V apply the 2020 to 709 Lut. Then “Preview” the lut in monitor so it doesn’t bake in to the SSD Footage. Then the SSD footage should be in Clog3 still? So when I import footage to resolve I apply the LUT once more? Also keep legalize on or off?
Indeed, the captured footage will be C-Log 3 / Rec.2020, the LUT on the Ninja V only works as a preview, unless you bake it in by enabling the output LUT toggle, and indeed, you’ll have to use the LUT on Resolve to get it back to Rec.709. To preview the image on the Ninja V, in order to check exposure trough false color or waveform, enable the “legalize” toggle; to record, you can disable the legalize toggle, and then, in Resolve, enable the full levels or data levels on the footage/clip settings.
Amazing research! I couldn’t find anywhere the answer i was looking for until i found this article! If i understood correctly with legalize enabled bt2020 will always show up as bt709? but it’s still bt2020? Also why does internal work ok, but external full range doesn’t in final cut and premiere pro? I’m using R6. thank you!
Q: “with legalize enabled bt2020 will always show up as bt709?”
A: BT.2020 (also known as Rec.2020 and ITU-R BT.2020) and BT.709 (also known as Rec.709 and ITU-R BT.709) are color spaces in a broadcast signal or archive, a signal or archive that have an specific video levels.
About levels, which refer to the range of values that are used to represent the brightness and color information in a video signal or file.
Most tv standard broadcasting equipment work with digital legal/video/limited levels for legacy reasons, in a digital video signal or file, light information is transmitted or stored digitally, for example, a full color 24bit video signal or file uses 8 bit per channel (RGB) to represent brightness, a full range video signal or file uses the range from 0 for pure black, to 255 for pure white, where as a legal/video/limited level video or signal uses a range from 16 to 235.
DSLRs and Mirrorless cameras are NOT standard broadcasting equipment, and produce a non standard full range video signal and files that take advantage of the whole digital range in the video signal or file.
Q: Also why does internal work ok, but external full range doesn’t in final cut and premiere pro?
A: Because even tho internal recordings on DSLRs and Mirrorless cameras are stored as full range, each file has headers with metadata indicating its levels, most non-linear editors (NLE) like Final Cut, Premiere, Resolve, etc. can read the file metadata and interpret the video/data levels accordingly, if no metadata is found, most NLEs asume it is a legal/video/limited file. In the case of an HDMI signal like the one recorded by the Atomos Ninja, the signal is recorded as it is received without knowing nor understanding the exact video levels, gamut or color space, it is because this reason that the Atomos Ninja cannot record the necessary metadata into the video file indicating the video levels.
The Atomos Ninja V can “legalize” the levels received in order to display and record using legal levels, and for previewing purposes using a LUT, it is recommended to enable this toggle, because most technical LUTs provided by the manufacturers, work under a legal/video/limited range and NOT in full range.
After previewing your scene with the manufacturer technical LUT enable and the legalize toggle enabled, you can disable it and record in full range, then, on DaVinci Resolve, choosing to interpret the footage as a full level file, or full data file. Sadly, only DaVinci Resolve is able to do that, Adobe Premiere and Final Cut do not have the option for setting the video levels of an input file, in the case of those, leave the legalize toggle enable in your recordings.
Another issue that is worth mentioning is that Canon’s “Cinema Gamut” color space doesn’t work over HDMI because it isn’t an HDMI standard color space, that is why you should use BT.2020 for 10bit external recordings. For internal recordings you can use Canon’s “Cinema Gamut”.
Information about video levels:
https://www.thepostprocess.com/2019/09/24/how-to-deal-with-levels-full-vs-video/
About Rec.709
https://en.wikipedia.org/wiki/Rec._709
About Rec.2020
https://en.wikipedia.org/wiki/Rec._2020
This was a lifesaver. I kept seeing posts recommending Cinema Gamut, and also the benefits of shooting with an external monitor, but I kept getting a lot of extra noise/grain in my shots, even in well-lit situations and using native ISO levels. Did a lot of testing, and internal footage looked 10x better than the external. After switching to BT2020, all the weird noise was gone, and my colors look correct on external.
I’m glad it helps you.
Just wanted to drop another comment in support of this write-up – amazing work. I’ve read so much conflicting information and my head was spinning trying to get everything in order.
This has really demystified everything and I really appreciate that you’ve taken the time to explain it all rather than just recommend particular settings.
I’ve got a lot more confidence in what I’ve got set, and why now. Thanks so much!
I’m very glad to know that it has been useful to you.
Hello everyone!
I have set my R5 an Ninja V with the recommendation but have a problem with triggering. From camera record button Ninja V does not records. Is it vital to have the HDMI to micro HDMI cable from Atomos brand for it? Thanks
To enable your Canon EOS R5 to trigger recording on the Atomos Ninja V via HDMI, you’ll need to configure settings on both devices properly. Here’s a step-by-step guide to set this up:
On the Canon EOS R5:
Switch to Video Mode:
Turn on your EOS R5 and set it to video mode using the mode dial or menu settings.
Connect the HDMI Cable:
Use a compatible HDMI cable (preferably HDMI 2.0 for higher resolutions like 4K) to connect the HDMI output of the EOS R5 to the HDMI input of the Ninja V.
Enable HDMI Output:
Go to the camera’s menu:
Press the Menu button.
Navigate to the Video/Shooting menu (the camera icon).
Find the HDMI display option (usually on page 8 or similar, depending on firmware).
Set it to Camera + External Display so the feed is sent to the Ninja V while still showing on the camera’s screen.
This ensures the HDMI signal is active.
Set Up Timecode and Recording Trigger:
In the same Video/Shooting menu, locate the Time code settings (may be under a sub-menu like “HDMI” or “Timecode”).
Set Time code to On.
Set Rec Command (or HDMI Rec Command) to On. This allows the camera to send a start/stop signal to the Ninja V when you press the record button on the camera.
Note: For this to work, the camera typically needs a memory card inserted unless you’re recording RAW externally (more on this below).
Adjust Resolution and Frame Rate:
In the Movie rec quality settings, choose your desired resolution (e.g., 4K HQ, 4K 60p, or 8K if supported by your firmware and Ninja V model).
Ensure HDMI RAW output is set to Off unless you specifically want RAW recording (requires Ninja V+ or updated firmware for 8K RAW).
Turn Off Overheat Control (Optional):
If you’re recording externally to avoid overheating, go to Overheat control in the menu and set it to Off. This helps maintain a stable HDMI signal for longer sessions.
On the Atomos Ninja V:
Power On and Connect:
Turn on the Ninja V and ensure it’s connected to the EOS R5 via HDMI.
Check HDMI Input:
The Ninja V should automatically detect the HDMI signal. Verify the display shows the camera feed and confirms the resolution (e.g., 4K 29.97p).
Enable HDMI Trigger:
On the Ninja V, tap the screen to access the menu:
Go to the Input menu (gear icon at the top).
Scroll to Trigger settings.
Set Trigger Type to HDMI and toggle it to On. This allows the Ninja V to start/stop recording based on the EOS R5’s record command.
Set Recording Format:
In the Record menu:
Choose your preferred codec (e.g., ProRes 422 or ProRes RAW if supported and activated).
Ensure the frame rate and resolution match the camera’s output.
Verify Settings:
Exit the menu and check that the Ninja V displays a “standby” or “ready” status. When you press the record button on the EOS R5, the Ninja V should begin recording simultaneously.